Showing posts with label work in progress. Show all posts

Friday, 9 December 2016

Spoonflower Contest - Ditsy Mistletoe

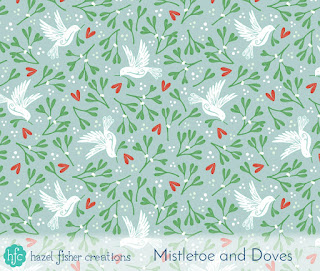
This week I had fun creating a festive, mistletoe inspired design for Spoonflower's 'Ditsy Mistletoe' contest.  I was also more than a little excited to have learnt a different way of designing patterns (more on that below!).
Of course one of the first things to come to mind when you think of mistletoe is the tradition of kissing under the mistletoe, but Spoonflower's brief for the contest also talked about the plant being a symbol of peace in Scandinavia, under which enemies would declare a truce.  So my design is inspired by love and peace and incorporates mistletoe with doves and hearts.

Spoonflower Ditsy Mistletoe design challenge - my Mistletoe and Dove design by Hazel Fisher Creations

Friday, 28 October 2016

My Entry to Spoonflower's 'Lace Gift Wrap' Design Contest

If you follow me on Instagram or Facebook you will already have seen a peek at my design for this week's Spoonflower contest: Lace Gift Wrap. Inspired by images of vintage lace, which I found on Pinterest, I created a detailed, floral and leaf pattern.  Everything in this design was hand drawn in black pen (I like to use Faber Castell PITT artist pens), before being scanned and assembled into the finished pattern digitally.  As the design was too large to fit on 1 sheet of A4 I had to draw it on several sheets of paper...

Spoonflower Contest - Lace Gift Wrap, finished White on Charcoal hand drawn surface pattern designs by Hazel Fisher Creations

Friday, 21 October 2016

My Entry to Spoonflower's Annual Tea Towel Calendar Contest - 2017 Tropical Toucan

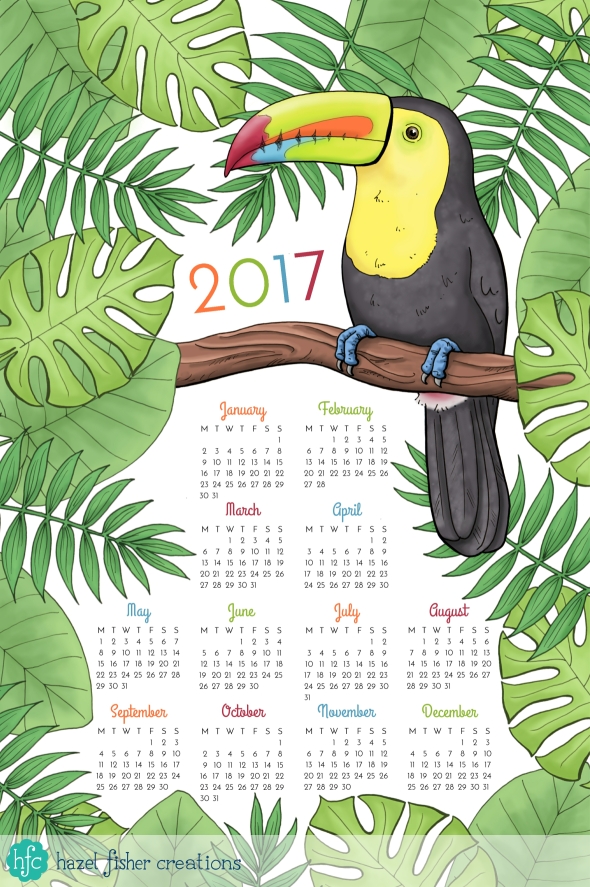
It's that time of year again - time for Spoonflower's annual tea towel calendar contest!  This year I decided to go for a tropical theme and created a design featuring a colourful toucan surrounded by leaves (I love to draw birds!).  Here's what the finished design looks like...

Spoonflower Contest entry - Toucan Tea Towel Calendar design by Hazel Fisher Creations

Wednesday, 29 May 2013

Clockwork Rabbit

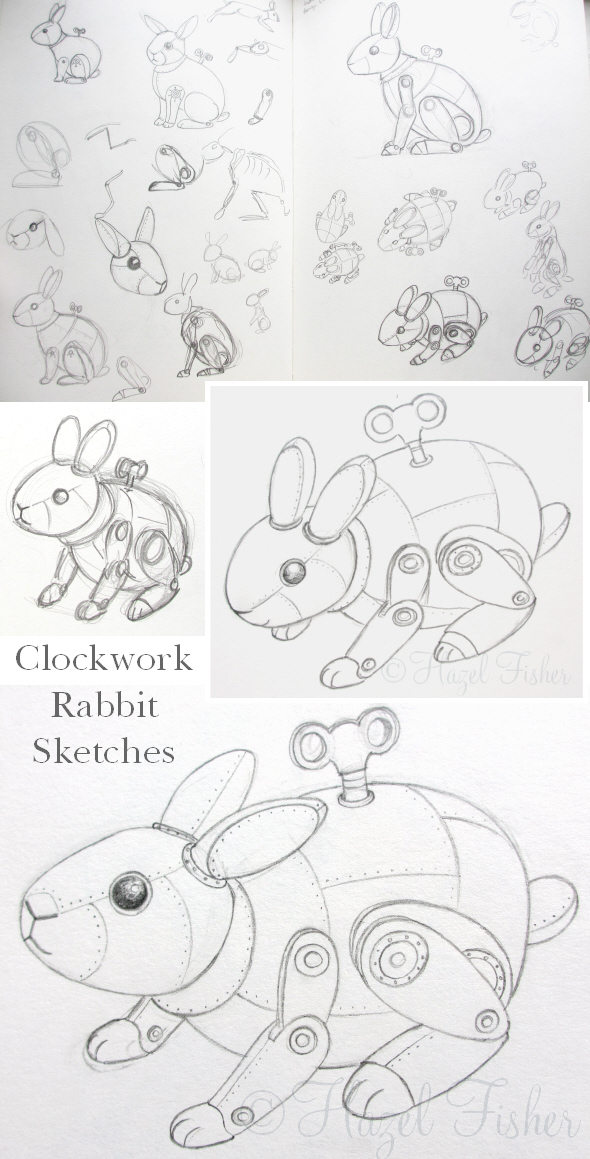
I recently received a commission to design a Clockwork Rabbit to be used as a tattoo.  Although I have drawn several different clockwork birds now and the odd fish I have not done anything like the rabbit before.  I enjoyed the challenge of working out how to illustrate the bunny so that it looked like a clockwork animal that could work but still looked like a rabbit.  Here are some pictures from my sketchbook…

This is the final illustration drawn in dip pen and ink…2013May29 steampunk clockwork rabbit inked 
Although I can’t see myself ever having a tattoo (not a fan of needles!), the idea that someone else would want my designs permanently drawn onto their body is such an honour!  Here’s the finished tattoo of the rabbit…

2013May29 steampunk clockwork rabbit tattoo

Friday, 18 January 2013

Painting Cats

Pet cat portrait 1
Just before Christmas I received a commission to paint this pet cat portrait.  I enjoy the challenge of capturing animals on paper and it’s lovely to be able to make something special for someone.

When I paint a portrait I work from several different photos to create a unique piece – so I can change the background or combine  different images to get the right pose.  Once the rough sketch has been approved I can start work on the final painting.  I work with pencil and watercolours, gradually building up layers of paint.  I also used masking fluid in this portrait to keep highlights such as the whiskers.
Pet cat portrait 2
I recently updated the ‘animal art’ page on my website which has a little bit more information on how my pet portrait commissions work.

Friday, 10 August 2012

Clockwork Kingfisher - from sketchbook to finished illustration

If you saw the picture on my facebook page yesterday you might have already guessed that I was working on a Kingfisher as my next clockwork bird.  I thought I would share some photos to show you my working process from sketchbook to finished illustration.  I did try to make a slideshow but it wasn't uploading properly so here are some still photos instead...
All my illustrations start life in my sketchbook.  I use reference photos to get an idea of the birds shape and test out some colours.  I've developed a sort of formula for turning real birds into clockwork form but things like the colour patterns, wing, body and beak shape makes each bird unique. 
Once I have a rough idea of the design I start working on watercolour paper.  I use 140lb, extra smooth hot pressed paper - it's great for detailed pen work and watercolours.
When I am happy with the bird in pencil I can start drawing in pen.  I use a dip pen and brown ink - it's waterproof so won't be smudged when the colour is added and I like the quality of line the dip pen produces.
When the ink is completely dry it's time to start adding some colour...
I use tubes of watercolour - but I like to squeeze them onto my palette and leave them to dry, making my own set of watercolour pans.  Does that sound like an odd way of using watercolours?
The colour is built up slowly with layers of paint...
Normally I leave the painting to dry overnight before scanning it - watercolours become lighter as they dry and obviously I don't want wet paint on the scanner!  I made sure that I didn't paint the blues too pale as scanners sometimes have trouble picking up very light shades of blue.
Here's the scanned version of the Kingfisher... 
Now it's time to work on the illustration digitally in Photoplus.  I add a background using various scanned textures and clean up the scanned bird, removing the white paper from the scan.  I will use the finished illustration for different sized prints, the largest will be 8x10 so that's the size I work with now.  It's better to reduce the size of the orginal later rather than to try and enlarge it which might reduce the quality of the image.
Almost finished now - I add the text 'Edwin Cracknell's Clockwork Birds' which appears on all the clockwork bird illustrations.  I also write the title of this piece (Model No.13 Alcedo atthis ~ Kingfisher) in dip pen and ink, scan it and add to the illustration.
And here is the finished Clockwork Kingfisher! :)


Monday, 2 July 2012

London sketchbook

My new London themed printables are almost finished now - I thought I'd share a peak at my sketchbook with you before the finished designs are ready to post...

Wednesday, 25 April 2012

Something fishy

I've been working on some new fish illustrations and thought I would share some pictures of my work in progress...

I started with lots of sketches of different types of tropical fish...
I chose a mixture of freshwater and marine tropical fish, focusing on colourful ones or fish with bold patterns. These illustrations were drawn in pen and watercolour pencil...

I then scanned these drawings and finished colouring them digitally...
I'll be using these fish in scrapbooking papers, greeting cards etc. - more on the finished designs soon!

Spending so much time drawing fish made me want to visit the fish shop again - yesterday I bought 2 mollies and 2 panda corydoras for my tank.  The Panda corydoras are my favourite corys - they're the sort of fish I based my DORA illustration on. :)

To celebrate reaching 100 likes on my facebook page I have decided to hold a giveaway - look out for more on that later this week!

Wednesday, 25 January 2012

Cupcakes and Roses

Last week I shared a sneak peak of my latest project so I thought I'd post an update...
I have been designing backing papers and motifs for a new cardmaking kit with a cupcakes and roses theme.  Each design starts as a hand drawn image - made from a combination of pen, watercolour pencils and watercolour paint.  I scanned these and finished them digitally...
The papers are all designed now and I am finalising the other elements to the kit; card blanks and embellishments.  I'm really pleased with how this kit is going and looking forward to when it's all finished and ready to list in my shop! :)