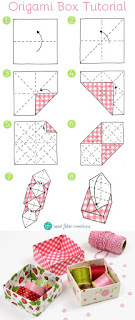
 These origami boxes are fun to make and really useful too! They're great for storing little bits and pieces from your crafty stash like washi tape, or for using as gift boxes. You can change the look of your boxes by using different coloured paper, patterned paper and by varying the size of paper.
I used some printable scrapbooking papers which I designed to make my boxes, from my Strawberries and Summer Garden sets of papers. (You can find these and more in my Etsy shop, hfcSupplies).
I printed the designs to fit on A4 white paper with a weight of 120gsm - paper this weight or slightly thinner works well for the origami boxes.
 Before you start folding your box you will need to cut squares of your paper. The paper I used was 20.4 x 20.4cm (approx. 8 x 8 inches), this produced boxes which measured approx. 7.25 x 7.25 x 3.5 cm (approx. 2.85 x 2.85 x 1.4 inches). If you want to make a box with a lid, cut one square slightly smaller than the other.
1. Start with your paper patterned side face down. Fold the square in half to form a rectangle. Open out and repeat in the other direction.
2. Now fold your square in half diagonally, open out and repeat in the opposite direction then open out again.
3. Fold each point into the centre, then unfold to your square again.
4. Fold each point of the square to the point three-quarters across, as in the diagram below, then open out again.
5. Now fold each point one quarter across, then once again open out to the square.
6. Now fold 2 opposite points to the centre.
7. Push the sides up to start making the 3-dimensional box shape (see diagram below).
8. Finally tuck the remaining 2 corners inside the box. Your box should keep its shape on its own, but if you like you can use a little glue to secure the triangle points to the base of the box.
 Now you are ready to fill your boxes! What will you put in yours? Share your makes with #myhfcmakes so we can all see what you have made!
PS. If you love crafty projects and would like some free printables, check out my blog challenge here! (You could even use the free printable paper to make some of these boxes!)


Lovely box Hazel, super easy instructions Lxx
ReplyDeleteThank you Linda, glad you like it! :)
DeleteI love this box! Can you convert the measurements into inches?? Thank you in advance.
ReplyDeleteCarol
Hi Carol! I'm glad you like this box :) I've updated the tutorial so the measurements in inches are now also included.
DeleteThat is amazing, beautiful. I love the seeing your posts you do such amazing working.
ReplyDeleteHI Hezel, you have done awesome craft works here. All the origami pictures look so adorable and brilliant. The method of making origami box absolutely stunning. I am happy for landing this outstanding DIY projects. Surely love your work.
ReplyDeleteGood Job, thanks for sharing this informative
ReplyDeletetopic with us