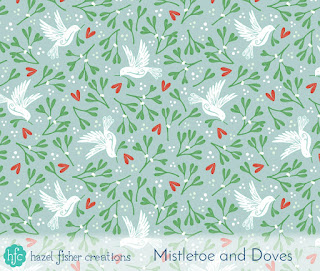
This week I had fun creating a festive, mistletoe inspired design for Spoonflower's 'Ditsy Mistletoe' contest. I was also more than a little excited to have learnt a different way of designing patterns (more on that below!).
Of course one of the first things to come to mind when you think of mistletoe is the tradition of kissing under the mistletoe, but Spoonflower's brief for the contest also talked about the plant being a symbol of peace in Scandinavia, under which enemies would declare a truce. So my design is inspired by love and peace and incorporates mistletoe with doves and hearts.

As usual, my design started off life in my sketchbook, with sketches of mistletoe and ideas of how I could make it into a pattern. I then made some pen line drawings to scan into the computer. I added some details onto the dove, inspired by Scandinavian patterns, and the heart shapes are based on the mistletoe leaves.

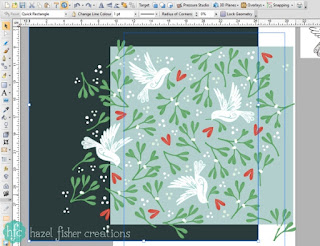
Usually I would then work in Photoplus to create my pattern. I wanted to use my pen drawings, to keep a hand drawn feel to the design, but I didn't want the black outlines, so decided to work in Drawplus and convert the drawings to vectors. I have worked this way a bit before, but usually end up taking the pattern into Photoplus to create the repeating pattern. After a quick bit of research online and some experimentation I found out how to create the whole pattern in Drawplus!

After converting the drawings to vectors and colouring them, I arranged the elements to create a pattern ready to repeat. I then selected these elements and created a 'Vector Fill'. Next, I drew a rectangle shape and filled it with the 'Vector Fill' I had just made. The 'Fill' tool then has options which allow you to adjust the spacing and alignment of the repeat. I loved this part because it quickly allows you to see how your repeat is working and where any gaps might be. With a bit of backwards and forwards, filling in the gaps I made new 'Vector Fills' until the pattern worked seamlessly. I'm looking forward to trying out this technique again for other patterns!

For the Spoonflower contest I entered the version of my design with a blue/grey background. I also really like how it looks with a dark grey background, so once I have test swatches printed, I will make both available to buy in my Spoonflower shop.
If you like this design I would really appreciate your vote in the contest! (If the design makes it into the top 25 it will be available for sale as soon as the results are announced!) There are also lots of other lovely mistletoe designs to see - view all the designs, and vote for your favourites here: http://www.spoonflower.com/contests/ditsy-mistletoe
** UPDATE ***
Thank you so much if you voted for my design in the contest - it made it to 12th place (out of 240 entries)!! That means the design is now available to buy on fabric from Spoonflower - you can find it here. The version with the dark background will be available too as soon as I have a test swatch printed.
Of course one of the first things to come to mind when you think of mistletoe is the tradition of kissing under the mistletoe, but Spoonflower's brief for the contest also talked about the plant being a symbol of peace in Scandinavia, under which enemies would declare a truce. So my design is inspired by love and peace and incorporates mistletoe with doves and hearts.

As usual, my design started off life in my sketchbook, with sketches of mistletoe and ideas of how I could make it into a pattern. I then made some pen line drawings to scan into the computer. I added some details onto the dove, inspired by Scandinavian patterns, and the heart shapes are based on the mistletoe leaves.

Usually I would then work in Photoplus to create my pattern. I wanted to use my pen drawings, to keep a hand drawn feel to the design, but I didn't want the black outlines, so decided to work in Drawplus and convert the drawings to vectors. I have worked this way a bit before, but usually end up taking the pattern into Photoplus to create the repeating pattern. After a quick bit of research online and some experimentation I found out how to create the whole pattern in Drawplus!

After converting the drawings to vectors and colouring them, I arranged the elements to create a pattern ready to repeat. I then selected these elements and created a 'Vector Fill'. Next, I drew a rectangle shape and filled it with the 'Vector Fill' I had just made. The 'Fill' tool then has options which allow you to adjust the spacing and alignment of the repeat. I loved this part because it quickly allows you to see how your repeat is working and where any gaps might be. With a bit of backwards and forwards, filling in the gaps I made new 'Vector Fills' until the pattern worked seamlessly. I'm looking forward to trying out this technique again for other patterns!

For the Spoonflower contest I entered the version of my design with a blue/grey background. I also really like how it looks with a dark grey background, so once I have test swatches printed, I will make both available to buy in my Spoonflower shop.
If you like this design I would really appreciate your vote in the contest! (If the design makes it into the top 25 it will be available for sale as soon as the results are announced!) There are also lots of other lovely mistletoe designs to see - view all the designs, and vote for your favourites here: http://www.spoonflower.com/contests/ditsy-mistletoe
** UPDATE ***
Thank you so much if you voted for my design in the contest - it made it to 12th place (out of 240 entries)!! That means the design is now available to buy on fabric from Spoonflower - you can find it here. The version with the dark background will be available too as soon as I have a test swatch printed.

No comments:
Post a Comment