Showing posts with label dragon. Show all posts

Friday, 8 May 2015

How to Make: Dragon Cut & Sew Plushie

2015 April Dragon cut and sew plushie fabric Spoonflower diy tutorial hazelfishercreations 1A few weeks ago I posted a picture of the dragon I had made up from the Cut & Sew pattern I designed for Spoonflower.  I finally got around to taking some more photos, so I can now share this tutorial on how to make him!
You will need the Cut & Sew Dragon pattern from my Spoonflower shop.   The design fits onto a fat quarter of any fabric which is 54 inches wide (or wider).   I made mine from Silky Faille, but you could also use Linen-Cotton canvas or another fabric which is at least 54 inches wide.  The finished dragon will be about 15 inches tall.

2015 April Dragon cut and sew plushie fabric Spoonflower diy tutorial hazelfishercreations 6
You will also need:
  • Scissors
  • Needle and thread (or a sewing machine)
  • Stuffing
  • Fusible interfacing (optional)
  • Knitting needle or similar object to help with turning out.
There are instructions printed onto the fabric, but I will include a few more tips to help you here...

1. Cut out the front and back body pieces and 2 wing pieces along the dashed lines.

2. This is an optional step – Iron fusible interfacing onto the reverse of one of the wing pieces.  I did this because I made the dragon from silky faille, which is a lighter fabric than the linen-cotton canvas, to give the wings a stiffer structure.

3. With right sides together, sew with backstitch (or machine stitch) around the edge of the wings, close to the outline.  Leave an opening between A and B.

4. Trim and clip seams (around the curves and points of the wings).  Turn the wings out – a knitting needle or similar object will help you to gently turn out the points of the wings.  Lightly stuff, then sew the gap closed with ladder stitch.
 2015 April Dragon cut and sew plushie fabric Spoonflower diy tutorial hazelfishercreations 4
5. Sew the wings to the back body piece along the centre line (marked on the wings and the back piece.

6. Pin the dragon front and back with right sides together and the wings folded in half through the gap between C and D (see below)  Sew the dragon front and back together, leaving an opening between C and D.

2015 April Dragon cut and sew plushie fabric Spoonflower diy tutorial hazelfishercreations 37. Trim seams and clip around the ears.  Turn the right way out.

8. Stuff and sew closed the opening between C and D using ladder stitch.
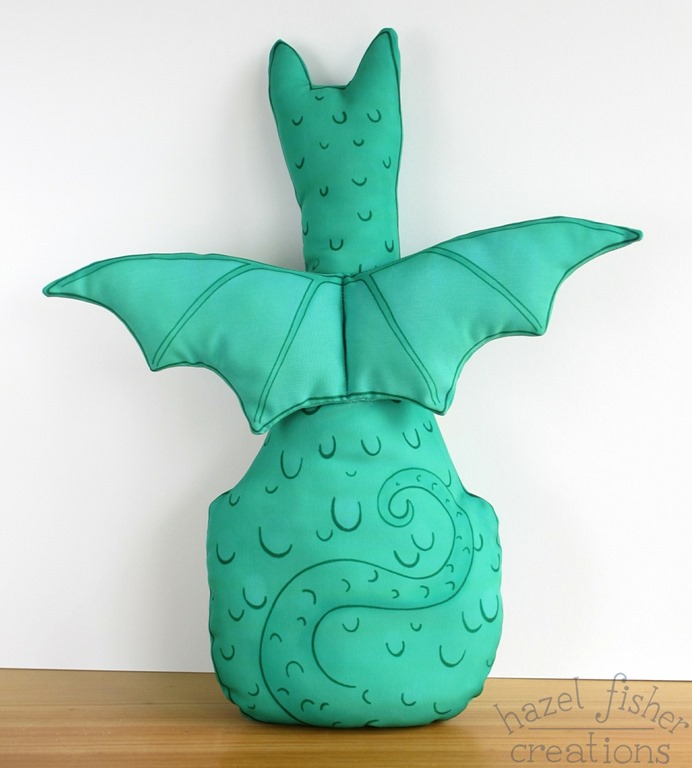
2015 April Dragon cut and sew plushie fabric Spoonflower diy tutorial hazelfishercreations 2
If you make up one of my dragons I would love to see how it turns out!  You can leave a link to your photos below, or email me at hazel.illustrator@live.co.uk

Monday, 9 March 2015

Ups and Downs with Dragons, Horses and a Guinea Pig

The last week or so has been full of ups and downs for me, which I meant to blog about before now, so I have a few different things to share.  I’ll start off with the ups…

Thursday before last, I had a lovely surprise when I found out that my Dragon design made the top ten in Spoonflower’s Mythical Creature Plushie pattern contest!  It came 6th (out of 149 designs) with 314 votes – thank you to everyone who voted for it!  Wood Mouse Bobbit’s Griffin Kitten design came first – it was my favourite entry to the contest so I was really happy for her to win.  Her design consisted of lots of different parts to create a 3D toy, so it was a very impressive design and looked great made up.
I have ordered a print of my own dragon design and should have it within the next week or two, and will then be able to make it available to buy from my Spoonflower shop.  I’ll let you know when it arrives!

2015 March 6 Dragon mythical creature plushie pattern fabric photo Spoonflower contest hazel fisher creations 1
In other good news, I had a new card design released with Phoenix Trading last week.  It features rows of horses with different markings; palomino, piebald etc. so would be great for horse lovers! Here’s a pic from the new catalogue (my design is on the right):

2015 March 6 phoenix trading spring range catalogue picture horses card hazel fisher creationsThe samples of my horse card design arrived early this morning and I love how the design has been printed on matt card with the horses embossed…

2015 March 9 phoenix trading horses card hazel fisher creations 12015 March 9 phoenix trading horses card hazel fisher creations 2I have been busy working on new designs to submit for Phoenix surveys but I can’t show you any pictures of those yet.  They are for general, everyday cards and Christmas ones.  Phoenix have regular surveys where designs submitted from all the artists are sent out to the traders who vote for their favourite designs.  Phoenix then use the results to choose which cards will be published in the next product release.  Fingers crossed they like my new designs!

As I mentioned at the start of this post, the week had it’s downs too.  Sadly my guinea pig Basil became sick and died last week.  Tuesday involved a trip to the vet for him and then I spent the rest of the day syringe feeding him with painkiller, medicine and special food.  Unfortunately he was very weak and didn’t make it through the night.  I’m missing him very much but take some comfort in knowing he is no longer in pain and we did what we could to try and help him.

2015 March 6 Basil guinea pig photo hazel fisher creations
To end on something a little better, I have a long list of blog posts planned with some things I’ve been making and baking recently (last weekend was my sister’s birthday so I baked her a fancy cake!).  I should have a bit more time to write about them next week, as my Christmas designs need to be in to Phoenix by the end of the week.  You can expect to be seeing more flower and garden photos soon too – the first daffodils are opening in my garden, announcing the arrival of spring and the weather has been warming up so I have started doing some gardening again.

Tuesday, 24 February 2015

Spoonflower Contest – Mythical Creature Plushie

Dragon Mythical Creature Cut and Sew Plushie spoonflower fabric design contest hazel fisher creationsThere were a lot of entries (324!) to last week’s Sheep themed Spoonflower contest – Viriginia O’s Night, Night Sleep Tight was a lovely winning design, beautifully drawn and I liked the simple colour palette of white lines on a blue/ grey background.  My design came 94th with 118 votes – thank you to anyone who voted for it!  You can see all the entries here.

This week’s challenge was to create a cut and sew pattern to make a plush mythical creature toy.  The pattern and instructions all had to fit on a fat quarter of linen-cotton canvas.  Although I have sewn little toys before I had never designed a pattern like this, so I was looking forward to the challenge of something new!  It was tempting to try and make a three dimensional creature, but with time constraints I thought I should keep the design as simple as possible.  I chose a dragon as my mythical creature and designed it with a front and back body piece and 2 wing pieces to be sewn onto the back piece.
Once I have a sample printed I will show you how it looks made up, then can start offering the fabric for sale in my Spoonflower shop.

You can see all of the entries to the Mythical Creature Plushie Pattern contest here, and vote for your favourites too!  http://www.spoonflower.com/contests/290