Showing posts with label food and recipes. Show all posts

Tuesday, 14 June 2016

Chocolate and Beetroot Cakes Recipe

Chocolate and Beetroot Cakes recipe - Hazel Fisher Creations
I baked these chocolate and beetroot cakes with my sister a few weeks ago when our neighbour gave us some beetroot from their allotment.  The cakes were delicious so I'm hoping that our own crop of beetroot will grow well this year and we can bake some more.  Our Mum, who's not that keen on beetroot, even liked them!
I created this recipe myself, by combining and adapting a few different recipes I found online.  Beetroot is a great vegetable to eat, packed with vitamins and minerals - so that makes these cakes healthy too - right?! I used a little less sugar than other recipes I saw, to make them healthier.  Also, they are not coated in a thick layer of frosting, just finished off with a dusting of icing sugar.

I hope I have tempted you to bake some for yourself, here's the recipe...

Ingredients
120g plain flour
50g cocoa powder
150g caster sugar
170g beetroot (cooked)
2 eggs
140ml vegetable oil
1 tsp vanilla extract
1 1/2 tsp baking powder
50g dark chocolate
icing sugar for dusting

Preheat your oven to 170°C / 325°F / Gas Mark 3.
Sieve the cocoa powder together with the flour into a bowl.  Mix together with the rest of the dry ingredients.
In a separate jug (or bowl), blend the beetroot with the eggs, one at a time. Then add the oil.  Blend until smooth.  Add the vanilla extract. (The beetroot makes the mixture a fantastic colour!)
Stir the wet mixture into the dry mixture.

Chocolate and Beetroot Cakes recipe - Hazel Fisher CreationsChop the chocolate into small pieces and fold into the mixture.
Spoon into cupcake cases.  Bake for 30 minutes - the cakes should spring back when gently pressed, or you can test the cakes with a skewer - it should come out clean when they are cooked.
Leave to cool, then dust with icing sugar.

Chocolate and Beetroot Cakes recipe - Hazel Fisher CreationsHappy baking (and eating)!!

If you liked this recipe you may also enjoy the other recipes I have shared - you can can find them here.

Wednesday, 28 October 2015

Halloween Cookies - Recipe and Spider Web Icing Tutorial

Halloween Cookies How to make a spider web pattern in icing hazelfishercreationsMaking spider web patterns in icing is a really effective way to decorate cookies and cakes for Halloween and they're actually very easy to do, children will love making these too!  Here is a recipe for making some simple shortbread biscuits, flavoured with cinnamon and spices as well as a tutorial on making the iced pattern...

To make the biscuits you will need:
9oz butter
2oz caster sugar
9oz plain flour
4.5oz cornflour
1 tsp mixed spice
1 tsp cinnamon

To make the shortbread, first cream the butter and sugar together in a bowl.
Sift the flours together with the mixed spice and cinnamon, then add to the butter and sugar.
Bring together the ingredients to form a dough and shape into a thick sausage.  Wrap this in cling film and chill in the fridge for at least 30 minutes (or put in the freezer for 15 minutes if you are short of time).
Divide the sausage into 16 equal slices.  Flatten and shape each slice into a circle about 3 inches (7.5cm) across.
Bake in an oven at 170°C / 325°F / Gas Mark 3 for 30-40 minutes, until light golden brown.

Leave to cool on a wire rack, then you are ready to decorate them...

Halloween Cookies How to make a spider web pattern in icing hazelfishercreationsFor the icing you need:
icing sugar
water or milk
black food colouring

Make up a batch of white glacé icing with icing sugar mixed with either some milk or water.  You want the consistency of the icing to be spreadable, but not too runny.
Make up a smaller amount of black icing by mixing black food colouring with your icing sugar and a little water.  Then put the black icing in a piping bag with a small round nozzle (if you don't have a piping bag make your own from a greaseproof paper or a small food bag with the very corner snipped off).

It is better to decorate the biscuits one at a time, as you need to make the spider web pattern before the white dries.
First, spread white icing over the biscuit, carefully spreading close to the edges.
With your piping bag, pipe 4 black circles which gradually get smaller in size towards the centre.
Using a cocktail stick, drag through the icing from the centre to the outside edge - repeat this to form the spider web pattern.  I found that 7 or 8 'spokes' looked best.
Leave to dry and they're ready to eat!

Halloween Cookies How to make a spider web pattern in icing hazelfishercreations
If you like this Halloween idea, do come and look at my blog again on Friday - I'll be sharing some more ideas of things you could make this weekend!

Thursday, 27 August 2015

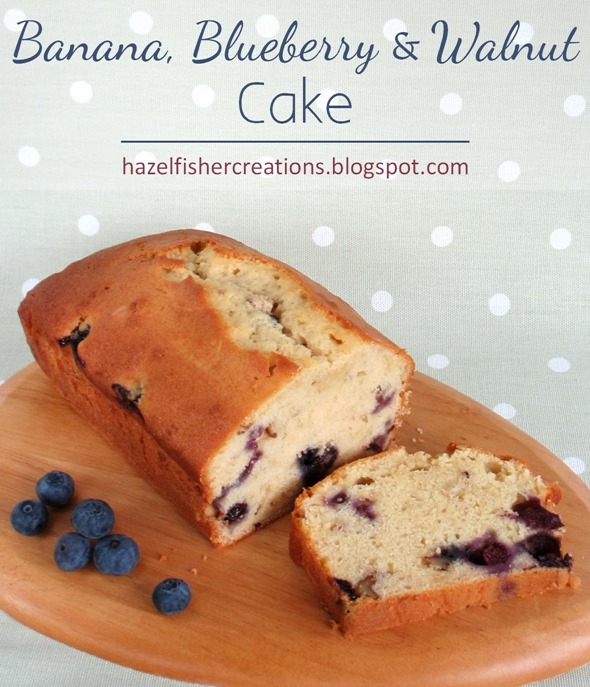
Recipe for Banana, Blueberry and Walnut Cake

This recipe is the result of not being able to concentrate on my work and deciding I may as well do something else; like bake a cake.  Maybe I was inspired by watching the Bake Off last night (their cheesecakes were amazing!). I didn’t want to bake anything too complicated but remembered they made Madeira cakes a couple of weeks ago, so this is my adaption of a basic Madeira cake recipe.  We had a ripe banana and some blueberries that needed using, so I added these to the mix as well as some walnuts (I only added a few walnuts, you can add more or less depending on how much you like them!).

2015Aug27 Banana Blueberry Walnut Cake recipe hazelfishercreationsTo make the cake you will need:
5oz / 125g butter
5oz / 125g caster sugar
3 eggs
8oz / 200g self-raising flour
1 ripe banana
handful of blueberries
handful of chopped walnuts

Method:
Heat the oven to 170C / 325 F / Gas Mark 3

Cream the butter and sugar.  Beat in the eggs with some of the flour, then fold in the remaining flour.

Mash the banana and stir into the mixture.  Then add the blueberries and chopped walnuts.

Place into a greased 22x11cm tin (approx. 8.5 x 4.25 inch), or a 18 – 20cm round tin (approx. 7 inch).

Bake for 55 mins – 1 hour, or until golden brown and when a skewer inserted into the cake comes out clean.  Leave to cool for 10 – 15 mins before turning out onto a wire rack to cool completely.

2015Aug27 Banana Blueberry Walnut Cake recipe hazelfishercreations 2

Wednesday, 29 January 2014

Hidden Star Cake

2014Jan29 Baking hidden star cake
I did some more baking on the weekend – this time I baked a sponge with a hidden star in it.  I have seen cakes with hidden designs on the Great British Bake Off and Pinterest (including some amazingly detailed ones I have pinned here) and thought they looked so good but must be hard to do.  Making this cake with a star was actually quite simple – I’m so pleased with how it turned out!

First I baked a strawberry flavoured sponge, coloured with red food colouring.  When this was cool I used a star cookie cutter to cut the sponge, and arranged the stars in a ring inside a round sponge tin so that every slice of cake would look like the photo above.  I then filled the tin, covering the stars, with a vanilla sponge.  I’ve never double baked a sponge like this before and thought it might make the cake a bit dry, so was pleasantly surprised with the end result which tasted as good as it looked!
Here’s how the uncut cake looked, decorated with buttercream, fondant stars and sprinkles…

2014Jan29 Baking hidden star cake 2
Have you ever baked a hidden surprise cake before - what design did you bake?

Monday, 17 June 2013

Cheesy Muffin recipe

june 17 cheesy muffins 1bI've got a bit behind with my blog again and have a list of things to write about!  Today I thought I would show you these muffins I baked a couple of weeks ago.  It was the first time I tried this recipe and they were delicious (cheese being one of my favourite foods, it wasn't a surprise that I liked them!).

june 17 cheesy muffins 3I adapted a recipe from a book – this is what I made…

To make the muffins you will need:
6 tbsp sunflower oil
10oz / 280g plain flour
1 tbsp baking powder
1/2 tsp bicarbonate of soda
pinch of salt and pepper
2 eggs
5 fl oz / 150 ml natural yogurt
5 1/2 oz / 150ml grated cheese (I used cheddar and red leicester but you could use anything you like)
fresh chives, chopped

Heat the oven to 200C / 400F / Gas Mark 6
Sift the flour, baking powder, bicarbonate of soda, salt and pepper into a large bowl.
In a second bowl, beat the eggs, then beat in the yogurt, oil, chives and cheese until smooth.  Make a well in the dry ingredients and add the liquid ingredients.  Stir until just combined, don’t over mix (it was quite a sticky, lumpy dough).  Spoon into a 12 hole muffin tin (I used silicon cases).
Bake for 20 minutes or until well risen, golden brown and firm.

june 17 cheesy muffins 2

Tuesday, 29 January 2013

Cheese and Tomato Chelsea Buns


jan 21 cheese and tomato rolls b
My favourite flavour combination has to be cheese and tomato – so that’s what we used when I baked these savoury Chelsea buns with my sister!
The recipe was based on Paul Hollywood’s turkey, stuffing and cranberry Chelsea buns which were on The Great British Bake Off.  We followed his method for making the dough but used our own filling:
I cooked some tomatoes (I prefer our home grown tomatoes for their flavour but canned tomatoes would work too) and added some sage and onion stuffing mix until the mixture wasn’t too runny.  Using dried stuffing mix feels like such a cheat but I love the smell and taste of these ingredients!
When the tomato mix was cool we spread it over the rolled out dough then sprinkled grated cheese on top.  Then we followed the Bake Off’s method for rolling and baking the buns. Yum!
jan 21 cheese and tomato chelsea buns 2b

Monday, 8 October 2012

Delicious Halloween Pumpkin Cakes!

I don't usually like eating pumpkin but these pumpkin cakes are delicious and they're perfect for Halloween!  This batch was baked yesterday based on a family recipe, I've decorated them with a fun spiders web pattern and some of my Halloween printable papers.
 
To make the cake you will need:
1 cup flour
1 cup sugar
1/4 teaspoon salt
1 teaspoon cinnamon (I also add a little ground nutmeg and mixed spice)
1/2 teaspoon baking powder
2 eggs, beaten
1/2 cup oil
1/2 cup pumpkin, cooked and cooled

For the topping:
icing sugar
milk or water
orange food colouring

Heat the oven to 180C / 350F / gas mark 4
The recipe I was given says to mix all ingredients together and pour into a floured tin.  I usually mix the dry ingredients together first, then add the beaten eggs, then the oil and finally stir in the cooked pumpkin.
I find the easiest way to cook the pumpkin is to heat it in the microwave for a few minutes until soft.  If the cooked pumpkin is very wet drain some of the liquid away before adding to the cake mixture to stop the cake from being too moist.  This recipe only uses a little pumpkin - if you're not making anything else with it the spare pumpkin (raw) can be cut into cubes and stored in the freezer, ready for baking another time. 
 
Pour the mixture into a tin or individual cupcake cases and cook for 25 minutes.
When the cakes are cooled they're ready to decorate!  Make some glace icing with icing sugar and milk or water.  Take some of the icing and colour for the spider web pattern, leaving the rest white.  (I gradually added a little yellow and red colouring until the colour looked right.)
Spread white icing onto a cake then pipe orange rings onto the white icing.  Using a cocktail stick draw lines through the icing, from the centre to the edge of the cake to create the spider web effect.  It's best to decorate one cake at a time rather than ice them all in white first.
I think the cakes look great with just this iced pattern on, but to finish these ones off I have also used some of my Halloween printables.
The designs were printed onto card, then cut out by hand.  The cupcake toppers can also be cut with a 2 inch circle punch.  For the circles, sandwich a cocktail stick between two circles of card and glue together.  I also used some of my new Halloween flags - for these simply fold in half with a cocktail stick glued in the centre fold.

Tuesday, 31 July 2012

Gingerbread Sports People for the Olympics

Gingerbread people baking recipe, sports for the Olympics - Hazel Fisher Creations
The Olympic opening ceremony was amazing!  Some of my favourites parts were the cycling doves, the transition from green countryside to industrial revolution and of course the Queen and James Bond!  It's been hard to resist watching the sport on tv all day - so many exciting sports to watch but I need to do some work too!
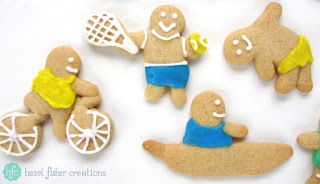
On the weekend I had fun making these gingerbread sportsmen with my sister (iced while watching the swimming).

Gingerbread people baking recipe, sports for the Olympics - Hazel Fisher Creations
We made gingerbread people for sports from swimming to cycling and equestrian to tennis.  Unfortunately there were a few accidents after they left the oven (the horse's tail fell off, the cyclist has a broken back wheel and the tennis player now has a bit of a dodgy shoulder!)

Gingerbread people baking recipe, sports for the Olympics - Hazel Fisher Creations
This is the recipe we used for the gingerbread sports people:
10oz (300g) self-raising flour
pinch of salt
3 tsp ground ginger
4 oz (100g) caster sugar
2oz (50g) margarine
3 tbsp golden syrup
4 tbsp milk

Heat the oven to 160C / 325F / Gas Mark 3 and grease a baking tray.
Mix the flour, salt and ginger in a bowl.  Warm the sugar, margarine and syrup and stir together then add to the dry ingredients and stir well.  Add milk and mix to make a firm dough.
Lightly knead the dough then roll out and cut out the people.  I used a little man cutter to cut a basic person shape before adapting to make different sports people.  You can experiment with the cutters you have - my horse was made from a cat shaped cutter!  I pushed one of its ears in to make a bigger head and pushed the tail down to look more horse like.  Other things like the tennis racket, bicycle etc were all moulded by hand.

Bake for about 10-15 minutes.  Allow to cool slightly before carefully lifting onto a wire rack. 
The biscuits were decorated with glace icing (we used yellow, red, blue and green food colouring - as we didn't have any black we mixed a dark purple for one of the rings from red and blue).

Gingerbread people baking recipe, sports for the Olympics - Hazel Fisher Creations

Monday, 9 July 2012

Custard Tart

I enjoy baking but don't always get a lot of time for it.  Recently my sister Sarah has had more free time than me so has been treating us to lots of yummy things!  On the weekend we had this custard tart - and Sarah wanted to share the recipe...
Make 4oz of short pastry...
4oz /112g  plain flour
pinch salt
1oz / 25g lard
1oz / 25g hard margarine
1 tbsp cold water
Mix the flour and salt in a bowl then rub in the fat.  Mix the cold water in to form a stiff dough.
Turn the dough onto a floured suface and knead lightly.  Roll out and line a 7 inch (18cm) flan dish with the pastry, trimming away any excess.  Prick the base lightly with a fork to prevent air bubbles from forming.  Blind bake the case - line the base with baking paper and cover with rice or baking beads.
Cook for 15 minutes at 190C / 375F / Gas mark 5
Remove the paper and rice or beads and return to the oven for a further 5 minutes.

For the custard filling...
2 medium eggs
1/2 pint / 300ml milk
2 tbsp sugar
grated nutmeg
Whisk the eggs in a heat proof bowl.  Bring the milk and sugar to the boil then pour over the eggs and cool.
Strain the custard mixture into a pastry case and sprinkle with grated nutmeg.  If you do this while the case is still on the oven shelf it's easier and you're less likely to spill the custard over the sides of the pastry!
Bake for about 20 minutes until set at 180C / 350F / Gas mark 4

Wednesday, 22 February 2012

Cupcakes and Roses – Cupcake Toppers

I’ve been torturing myself with the mouth-watering scent of cupcakes this morning :)  I can’t eat them yet though – they have to be photographed first!  I made them for the launch of my final Cupcakes and Roses product; cupcake toppers…
These printable cupcake toppers come as a high resolution 300dpi file for you to print and make yourself.  The sheet measures 8.5 x 11 inches (approx. A4) and each circle is a little over 2 inches in diameter, so you can either hand cut them or use a 2 inch circle punch without leaving a white border.
The toppers are perfect for making cakes look pretty quickly.  They are really simple to make – just cut two circles and glue them together with a cocktail stick in the middle!  These circles could also be made into gift tags or used in scrapbooking and cardmaking.
I used a 2 inch scalloped circle punch for the topper in the photograph on strawberry flavoured cupcakes.  If you would like to try baking some yourself here’s the recipe…

6oz soft butter
6oz caster sugar
3 eggs
6oz self-raising flour
pink food colouring
1tsp strawberry flavouring
makes 11 cupcakes
Cream the butter and sugar.  Beat in the eggs then stir in the flour.  Add the strawberry flavouring and enough pink food colouring to make the colour you like.
Spoon into 11 cupcake cases and bake at 180°C for 20 minutes – until golden and when a skewer is inserted it comes out clean.
I decorated the cakes by piping buttercream with a star nozzle.  To make the icing cream 3oz soft butter with 6oz icing sugar and add pink food colouring.
 
The printable cupcake toppers are available to buy from my Etsy shop and Folksy shop.

Monday, 5 December 2011

Parsnip, Carrot and Broccoli Quiche

I thought I would do something different today and share a recipe for a quiche we made last week.  It's a parsnip, carrot and broccoli quiche - we were using up some left over vegetables but you could try other vegetables or meat in the quiche too.

Make 8oz short pastry...
200g/ 8oz plain flour
pinch salt
50g / 2oz lard
50g/ 2oz margarine
about 30ml / 2 tbsp cold water
Mix the flour and salt then rub in the fat.  Using a knife to cut and stir, mix in the water to form a stiff paste.  Turn onto a floured board and roll out.  Line a 9 inch dish with the pastry.

For the filling...
Carrot, parsnip, broccoli
2 eggs
125ml/ 1/4pt milk
salt and pepper
cheese
Thinly slice the parsnip and carrot and cut up the broccoli into small pieces.  Boil the vegetables for a couple of minutes to partly cook them.
Place the vegetables in the pastry case.  Beat the eggs and milk, season and pour over the vegetables.  Cover with grated cheese.
Bake in a oven 190C/ 375F/ Gas mark 5 until set and golden brown - about 40 minutes.