Showing posts with label craft. Show all posts

Wednesday, 7 September 2016

DIY Decorated Pegs and Binder Clips

Decorated peg and binder clips DIY craft tutorial by Hazel Fisher CreationsAfter decorating my pencils, I thought I would continue with the pretty stationery theme and decorate some pegs and binder clips too!  I use these all the time - to hang things on the line above my desk, organise papers and keep hold of notes.

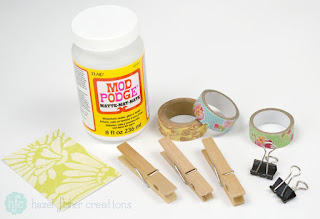
For this project I used the following materials:
wooden clothes pegs
binder clips
washi tape
small pieces of scrapbooking papers
Mod Podge (matte)
craft knife and ruler


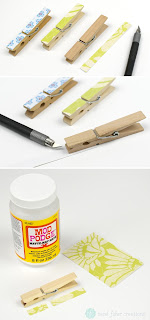
Decorated peg and binder clips DIY craft tutorial by Hazel Fisher CreationsA really quick way to decorate the wooden pegs is to use washi tape.  The tape is slightly wider than the pegs though and I found that it didn't stick so well down the sides of the pegs. You could either trim away the excess tape with a craft knife or use a little Mod Podge (or pva glue) to help it stick (which is what I did).

My favourite way to decorate wooden pegs though is with patterned scrapbooking paper as I think this gives a neater finish...
First measure the width of your peg and cut a strip of paper to size with a craft knife and ruler.
Next, measure and cut two pieces from your strip - for the top and bottom sections of the peg either side of the wire.
Glue these to your peg with Mod Podge and brush on a top coat of Mod Podge to seal.
Once this is dry you can repeat for the other side of the peg.
Decorated peg and binder clips DIY craft tutorial by Hazel Fisher Creations
For the binder clips I just cut pieces of washi tape to cover the backs of the clips...

Decorated peg and binder clips DIY craft tutorial by Hazel Fisher Creations
I hope that you enjoyed this project and have been inspired to decorate your own stationery!  I would love to see what you make - use #myhfcmakes when you share photos of your projects!

Monday, 5 September 2016

3 Techniques to Decorate Pencils

The start of September means it's back to school time again!  It's been a few years since I was last a student, but September still always feels like a time for fresh starts and new things.  My favourite part of going back to school after the long summer break was getting new stationery.  With this in mind, I've come up with some DIY projects for you to try - whether you're a student heading back to class, have children going back to school or, like me, just want an excuse for new stationery!  You can never have too much stationery - right?!
Today I'll show you 3 techniques for turning plain, boring pencils into something prettier.

[This post contains affiliate links - for more info click here.]
3 Techniques to Decorate Pencils - back to school diy stationery project, Hazel Fisher Creations

Materials used:
pencils
paint (tester paint pots, or acrylics)
washi tape
Mod Podge
tissue paper

I bought these plain wood pencils with erasers for a bargain price of 12 for £1 from The Works - I wasn't expecting too much for this price, but they're actually really nice and good to draw with too!
The paint pots are another bargain buy which I've had for years.  You only need a little paint for this project so try out what ever you have at home - acrylic paints should also work well, something which drys fairly quickly is best.

3 Techniques to Decorate Pencils - back to school diy stationery project, Hazel Fisher Creations
Technique number 1 for decorating the pencils is with paint - you could paint a solid colour, or patterns. For neat bands of colour (see yellow painted pencil below) I used washi tape to mask straight lines on the pencil.

3 Techniques to Decorate Pencils - back to school diy stationery project; paint and washi tape. Hazel Fisher Creations
I've combined 2 techniques on these pencils - once the paint dried I added some pretty washi tape.  On some pencils I wrapped a small piece around the pencil, which gives a narrow band of pattern. For a neat finish, make sure the edges of the tape line up!

Alternatively, you can stick the tape along the pencil lengthwise...
You'll need two pieces to wrap all the way around the pencil - use the first piece as a guide to cut the second exactly the same length.
I used a combination of Steampunk washi tape and gold paint on the pencil below.  You can also skip out the painting step and just use washi tape to completely cover the pencil (like I did for the spotty patterned pencil in the top image).

3 Techniques to Decorate Pencils - back to school diy stationery project; washi tape. Hazel Fisher Creations
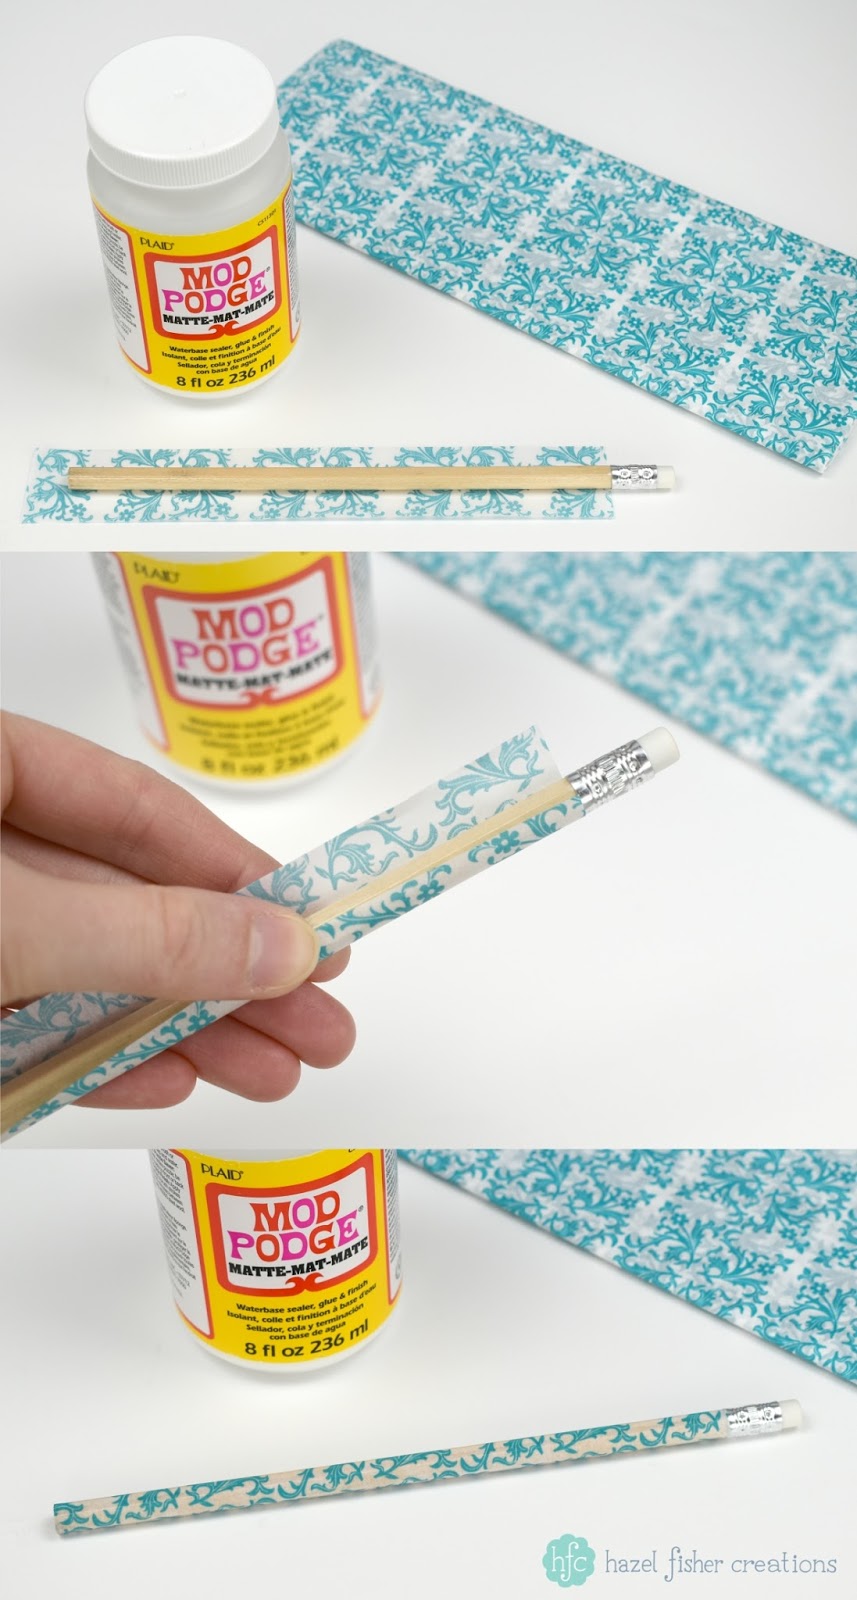
My third technique uses Mod Podge and tissue paper.  Cut a piece of tissue paper large enough to wrap around the pencil and slightly longer than the pencil.  I used a craft knife and ruler to cut a neat, straight edge on the paper.
Next, brush a thin coat of Mod Podge onto the paper and wrap around the pencil - start with one edge and smooth around the pencil.  I then brushed a coat of Mod Podge on top to seal the paper.
Once this is dry you can use a craft knife to carefully trim away the excess paper.

3 Techniques to Decorate Pencils - back to school diy stationery project; Mod Podge and tissue paper. Hazel Fisher Creations
These are all really quick and simple ways to decorate pencils for your own pencil case, but you could also make some to give as favours at parties - they could even be coordinated to match the colours of your event!
3 ways to decorate pencils by Hazel Fisher Creations
If you try these projects for yourself I would love to see what you make - use #myhfcmakes when you share photos of your pencils!

Thursday, 12 May 2016

Learn how to make your own sketchbooks

Learn how to make your own sketchbooks in the DIY tutorial by Hazel Fisher Creations
How to Make You Own Sketchbook - learn this bookbinding technique to make sketchbooks, journals and notebooks! hazel fisher creations
I have been making my own little books and sketchbooks for years and there are so many different techniques to try.  Once you learn the basics you will find that you can use your creativity to make each book totally unique!  Back in January I shared a tutorial on how to make really simple matchbook notebooks and today I will show you how to make something a little more complicated, using a stitched technique - but once you get the hang of it you can use it to make your own sketchbooks, notebooks, journals and more!

You will need:
paper for the pages (I used 140gsm cartridge paper)
strong thread (I used Gutermann's extra strong polyester thread)
pencil
ruler
pin
needle
craft knife and cutting mat
greyboard
linen / cotton fabric (for the spine)
decorative paper (for the cover - I used wallpaper)
PVA glue

1. Start by cutting your paper for the pages.  Cut all pages to the same size.  My paper was approximately A3 in size - so the finished sketchbook will be A4.  But you can make books any size you like!

2. Split your paper into sections - I used 4 sheets per section, with 5 sections in total.  Fold each section in half.

How to Make You Own Sketchbook - learn this bookbinding technique to make sketchbooks, journals and notebooks! hazel fisher creations
3. Take 1 section, open it out and mark holes, for sewing along the centre fold using a pencil. Repeat this for all sections.  You need an even number of holes, spaced the same for each section - so measure carefully!  These are the measurements I used for my pencil marks: measure from one end and mark at 1 inch, 2 inches, 3.1 inches, 4.1 inches and 5.2 inches. Repeat, measuring from the other side - so there are 10 dots.

4. Use a sharp pin (or an awl if you have one) to make holes through all sheets in each section, through your pencil dots.

How to Make You Own Sketchbook - learn this bookbinding technique to make sketchbooks, journals and notebooks! hazel fisher creations
5. Tie a knot in your thread and start sewing from the outside of the section to the inside, through your first hole.

6. See image 6 for my numbered diagram of the holes - sew in this pattern: up hole 2, down hole 3, up hole 4, down hole 5, up hole 6, down hole 7, up hole 8, down hole 9 and up hole 10.
Tip! Remember to keep pulling your thread tight as you go along, for a neat finish.

7. Now start to join the second section to the first.  Go down hole 10 in the second section, up hole 9, down hole 9 of the first section, up hole 10, down hole 10 of the second section, up hole 9 then down hole 8 of the second section.

8. Continue up hole 7 in the second section, down hole 7 in the first section, up hole 8, down hole 8 in the second section, up hole 7 and down hole 6 in the second section. Continue in this pattern until the first two sections are joined together.

9. It should now look like picture 9.  It might sound complicated, but it's easier once you try it for yourself and see the pattern working.

How to Make You Own Sketchbook - learn this bookbinding technique to make sketchbooks, journals and notebooks! hazel fisher creations
10. Repeat the same stitching pattern to join section 3 to section 2 and so on, until all sections are joined together. Tie a knot in the thread to finish off.

11. The spine of your book should look like image no.11.  Make sure that any time you need to start or finish the thread, the knot is on the outside.

12. Now you're ready to make the cover.  Start by trimming the edge of your book so the pages are even.

13. Cut 2 pieces of greyboard, slightly larger than the size of your book.

How to Make You Own Sketchbook - learn this bookbinding technique to make sketchbooks, journals and notebooks! hazel fisher creations
14. Cover the greyboard in your decorative paper (I used some bargain wallpaper I bought for £1 ages ago).  Also trim a piece of fabric for the spine, slightly longer than the book and wider than the spine.  I used a scrap of cream fabric which I think is linen and works well for this.

15. Fold over the ends of the fabric, so it is now the same length as your book and the raw edges will be hidden inside.  Glue the fabric along one side at a time.  I don't glue the actual spine, but along the  edge of the page close to the spine.  Leave to dry.

16. Glue the covers to the front and back pages.  Tip! - Leave to dry under a heavy book or board.

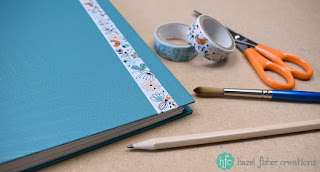
Finally I decorated the front cover of my book with some pretty tape...
How to Make You Own Sketchbook - learn this bookbinding technique to make sketchbooks, journals and notebooks! hazel fisher creations
I hope that you enjoyed this tutorial and feel inspired to try making some books yourself.  If you share your makes on social media, use the hashtag #myhfcmakes - I would love to see them! (You can find me on Instagram and Facebook)

How to Make You Own Sketchbook - learn this bookbinding technique to make sketchbooks, journals and notebooks! hazel fisher creations

Friday, 25 March 2016

Happy Easter! Finger Print Chick Cards

Finger print Easter chick cards - hazelfishercreations
If you are looking for activities to do with your children over the long Easter weekend, why not try making some finger print chick cards.  They are so simple, but great fun for kids (big and small!) to make.  I remember doing this when I was little and writing this blog post was a good excuse to pretend to be a child again and get messy!

All you will need is:
  • some card or paper
  • yellow paint (poster paint would be great, I used some acrylic)
  • pen or pencil

Start by using your fingers to print little yellow blobs...
Finger print Easter chick cards - hazelfishercreations
When the paint is dry, use a pen (or pencil) to draw on eyes, a beak, wings and feet to create your little chicks...

Finger print Easter chick cards - hazelfishercreations
You can draw in other things like grass, flowers or a 'Happy Easter' message...

Finger print Easter chick cards - hazelfishercreations
Happy Easter everyone, whatever you are doing I hope you have a lovely weekend!

Finger print Easter chick cards - hazelfishercreations

Finger print Easter chick cards - hazelfishercreations

Friday, 29 January 2016

DIY Matchbook Notebooks

DIY Matchbook Notebooks tutorial by hazelfishercreations
These matchbook notebooks are so simple to make and useful in lots of ways.  I often find I get ideas for new designs and things to make when I'm about to go to sleep, so I'll be keeping one of these to jot down ideas by my bed.  Being small, they're also great for popping in your handbag as a mini sketchbook (or for shopping lists) - especially if you're like me and cram a lot in your bag - I don't travel light!  You could also make them as favours to give away at parties or weddings - so many possibilities!

Materials:
Thin card / thick paper for the cover (see below for the scrapbook paper I used)
Paper for the pages - anything you like - white, coloured, lined or squared!
Stapler
Scissors / craft knife and ruler
Bone folder

DIY Matchbook Notebooks tutorial by hazelfishercreationsFirst cut all of your card and paper to size - I cut the card for the covers of my notebooks 23 x 8 cm and the pages 7.5 x 10.5 cm.  You can experiment with different sizes!

DIY Matchbook Notebooks tutorial by hazelfishercreationsTake the cover piece of card and measure and score 9.6cm from one end and 2cm from the other.

DIY Matchbook Notebooks tutorial by hazelfishercreationsThe number of pages you can use will depend on the thickness of your paper and the size of your staples. I used 12 pages in mine. Place your pages in the centre section of the cover, fold over the small end and staple the pages in place.

DIY Matchbook Notebooks tutorial by hazelfishercreationsThe long end of the cover should be able to just tuck under the short end when closed.

To finish off, I also added some patterned paper tape to the covers of some of my notebooks...

DIY Matchbook Notebooks tutorial by hazelfishercreations


A note about the papers used in this project...

For the covers of the notebooks I printed scrapbooking papers, which I have designed, onto 240gsm white card.  I used the rows of budgies design from my 'Budgies' set of papers, flower pattern from my 'Jessica' set, yellow spotty design from the 'Sunflowers' set and green chevron from the 'Summer Garden' set.  All of these, and more, are available to buy from my Etsy shop.

Scrapbook paper for Matchbook Notebooks hazelfishercreations

Tuesday, 7 July 2015

3 Perfect Picnic DIY Ideas

2015 June 26 summer picnic spread photo diy for wayfair hazelfishercreations 2
Remember in my June review I said that I was working on an exciting, secret project?  Well, today I can reveal that I was creating some diy picnic ideas for the Wayfair website's inspiration page!  It was the first time that I had been asked to put together a tutorial for someone else and I loved making the 3 projects and setting up the picnic spread!

The 3 projects are perfect for dressing up a summer picnic or garden party.  By making a few diy pieces you can make an event extra special and create a coordinated look to suit any occasion.  My pieces are for a summer garden picnic with pretty floral, gingham and spotty patterns but you could adapt these ideas by choosing any colour scheme or theme you like!
You can see the instructions on how to make a decorated bottle caddy, picnic blanket and pinwheel cupcake toppers on their website here.

2015 June 26 summer picnic spread photo diy for wayfair hazelfishercreations1
2015 June 26 summer picnic spread photo diy for wayfair hazelfishercreations 3
The lovely people at Wayfair sent me a selection of items to use in the diy projects and to style the picnic.  I also created some new designs to use in the projects – patterned papers with strawberries, flowers, gingham and spots which I used on the bottle caddy, pinwheels and straw flags.  Here are some of the items I used…

2015 June 26 summer picnic products wayfair blog post diy hazelfishercreations 1

Wood folding Table – from Wayfair

Hiball Glasses – from Wayfair

Porcelain Cake Stand – from Wayfair

Summer Garden Printable Straw Flags – my own designs, available from hfcSupplies.Etsy

Paper Drinking Straws – from ebay

Fleece throw (used to make the picnic blanket) – from Wayfair

Duvet Cover set (used to make the picnic blanket) – from Wayfair

Kilner Bottle Caddy- from Wayfair

Wood box – from Wayfair

Summer Garden Printable Scrapbooking Papers – my own designs, available from hfcSupplies.Etsy

Disclosure – I received a selection of free items from Wayfair to use in the DIY projects and for styling the picnic.  The craft projects and styling ideas are my own.

Friday, 15 May 2015

How to Make: 'Celebrate' Citrus Cake Card using the Silhouette Cameo to cut text

Celebrate Citrus Cake Card diy tutorial hazel fisher creations 1b
I am loving bright citrus colours at the moment – like in the colour palette I made from my birthday flowers.  I used this palette as inspiration for this card which is made with a patterned scrapbooking paper and digital stamp which I designed.  This card was also a good opportunity to make my first tutorial using my Silhouette Cameo cutting machine which I introduced earlier this week – I used it to cut the text on this card.  If you don't have a cutting machine you could cut the text by hand, print the word onto paper and stick to your card or hand draw it directly onto the card.


To make this card you will need:
  • White A6 card blank
  • Printable orange chevron patterned paper (see end of post)
  • Printable cupcake with a candle digital stamp (see end of post)
  • white card and paper
  • Coloured pencils and/or pens
  • 3x gems (I used pink and yellow round 5mm gems)
  • 3mm wide satin ribbon (I used lime green)
  • glitter glue
  • glue, double sided tape and foam pads
  • scissors, craft knife and cutting machine
  • Silhouette Cameo 2 cutting machine and Silhouette Studio software
  • Computer and home printer

1.  First you will need to print the patterned scrapbooking paper onto white paper and cupcake digital stamp onto white card.

2.  Cut the word 'Celebrate' with the Silhouette Cameo, using Silhouette Studio software:

Type the word 'Celebrate' (I used the font ‘Lobster’, which is free to download if you don’t already have it installed on your computer.)   I adjusted the size of the word so that the letters were approximately 3/4 inch tall.

Celebrate Citrus Cake Card diy tutorial silhouette cameo hazel fisher creations 3

You will see that some of the letters overlap. We just want to cut the outline, not where the letters overlap, so in 'Cut Settings', select 'Cut Edge'.

Celebrate Citrus Cake Card diy tutorial silhouette cameo hazel fisher creations 4

I cut the word from white card, with the ratchet blade set to no.2.  (I recommend doing a test cut first to check which setting you need).  After cutting the word I coloured it with pink felt tip pen – you could just cut it from pink card!

3. Glue the word ‘Celebrate’ onto the card blank.  Then stick the orange patterned background paper onto the card blank – lining it up with the word ‘Celebrate’, leaving a small gap between the word and background paper.  Trim the background paper to the size of the card.

4. Colour the cupcake (I used coloured pencils) then cut out leaving a small border around the edge.

5. Glue the ribbon along the edge of the orange patterned paper.  Glue 3 gems below the word ‘Celebrate’.  Then attach the cupcake to the card using foam pads.

6. Finally add some sparkle with glitter glue on the cupcake!

Happy crafting!

Celebrate Citrus Cake Card diy tutorial hazel fisher creations 4
About the papers used in this project: The printable scrapbooking paper and digital stamp I used in this card are both my own designs and are available to buy from my Etsy shop – the orange chevron paper is from the Citrus set of scrapbooking papers and the cupcake is from my Cupcakes and Roses set of digital stamps.

Celebrate Citrus Cake Card diy tutorial hazel fisher creations 2

Tuesday, 12 May 2015

Introducing my Silhouette Cameo 2 Electronic Cutting Machine

I have an exciting new machine to show you today – my Silhouette Cameo 2 Electronic Cutting Machine!
It’s still quite new to me, so I decided that a good way to learn all the features and ways of using the machine would be to set myself some projects to blog about.  I’ll be sharing some of those soon, but I thought that I would start off with just introducing the machine for anyone who has never seen one before.

2015 April 29 Silhouette Cameo cutting machine introduction hazelfishercreations 1
What’s a cutting machine? Why choose the Silhouette Cameo?
I do cut things by hand with a knife or scissors, but was considering buying a cutting machine which would be able to cut detailed designs, more quickly (and with less pain - not more hand cramp!).  There are various cutting machines on the market, from manual die cutting machines (eg: the Sissix Big Shot) which use metal dies, to electronic cutting machines which look like home printers but use a blade to cut rather than print designs.  I wanted an electronic cutting machine so that I could cut my own designs and not be limited by using dies.  Also, although the initial price of an electronic machine is more expensive they actually work out cheaper than a die cutter in the long run because you don’t have to buy a metal die for every design you want to cut.

I had looked at the Brother ScanNCut and the Cricut Explore before choosing the Silhouette Cameo 2.
There are pros and cons for each machine, but for me the Silhouette came out on top when balancing the features I was looking for with the cost (it’s about half the price of the Brother machine!).
Some of the features I like about the Silhouette Cameo…
  • Cuts a variety of materials including card up to 350gsm, fabric, magnet, vinyl – either using the 12x12 inch mat or on a roll feed.
  • Cuts your own designs using the Silhouette Studio Software, which is easy to use.  It also has an optical scanner to read registration marks printed on the design to cut precisely around the image.
  • Cuts fonts installed on your computer.
2015 April 29 Silhouette Cameo cutting machine introduction hazelfishercreations 2What comes in the box?
There are different packages available, with extra tools and pens, but I chose to buy the basic package from Amazon.
This included the machine, with power adapter and USB cable, Silhouette Studio software, blade, 12x12 inch cutting mat, crosscut blade and instruction booklet.  It also came with 100 free designs and a free 1 month's subscription to their design store.

How does it work?
I found it was easy to set up – it connects to your computer by USB and within a short time I was able to start cutting.  The only problem I had initially was that the cutting mat is very sticky when you first use it.  I tried a sheet of scrapbooking paper for my first cut – this became firmly stuck to the mat and was not easy to remove without tearing the paper, very frustrating!  I read that you can try pressing a smooth fabric (jeans!) over the mat to reduce some of the initial stickiness, also use a thicker card for your first cuts.  Now I’ve used the mat a few times it is much better.

There are extra tools you can buy, but I have been using things I already have.  For example, a scalpel has been helpful in picking up small pieces from the mat.  You can get a scraper tool to help ease paper from the mat after cutting, instead I have been using an old credit card.

These are a few of the shapes I have tried cutting so far.  I have been impressed with how accurately it cuts very small items – the letters are less than 2cm tall…

2015 April 29 Silhouette Cameo cutting machine introduction hazelfishercreations 3
I will be posting some projects I have used the Cameo with soon - the first one will involve cutting text to use on a card.

Do you have a Cameo or another cutting machine?  What have you made with yours?