Tuesday 31 May 2016

Making My Own Clothes - Jersey Tea Dress & Knitted Cardigan

I enjoy trying out different crafts and learning new techniques and that includes making my own clothes, although I am really slow at it!  I recently finished knitting a cardigan (which I have been making on and off since last August) and last year I made a jersey dress.


Making my own Clothes - The Great British Sewing Bee tea dress and Drops Design Cardigan - Hazel Fisher Creations
The cardigan I made was knitted using Drops Design pattern 164-13 'Green Forest Cardigan'.  They have a huge collection of patterns, which are all free too! I used Sirdar's 'Sublime extra fine merino wool DK' yarn which wasn't the recommended yarn but it seemed to work well.  I don't usually like yarn with wool content, but this yarn is so lovely and soft to knit with and wear.
The cardigan is knitted with circular needles and double ended pins for the sleeves (the first time I have used either of these).  Once the sleeves are knitted you join them into the body piece on the circular needles - so there are no seams and I think this makes for a really neat finish.  I also really like the decorative pattern on the sleeves and around the bottom.  There's no rib around the body though, so I find that it does tend to curl up!
I was a bit experimental with the buttons, using an assortment from my collection.  However, I think I may need to change some, as although I like the look of them, they are not quite the right size for the button holes.

Making my own Clothes - Drops Design Knitted Cardigan - Hazel Fisher Creations
This dress was made from the tea dress pattern in The Great British Sewing Bee Book. I made mine in a stretch jersey. I had never sewn with stretch fabric before so chose a cheap, plain, sea green fabric as a test - I intend to make another dress in a more interesting fabric (possibly something from my Spoonflower shop).  The stretch fabric was a little tricky to sew, but not too bad. I tried sewing the fabric with tissue paper to help stabilise it.  I also found tips from Tilly and The Buttons to be very helpful.

Making my own Clothes - The Great British Sewing Bee tea dress - Hazel Fisher Creations
To make it more fitted, I also made a simple belt using a long strip of fabric, to tie at my waist.  I added these cute little flower buttons to the shoulder seams too...
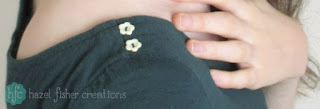
Making my own Clothes - The Great British Sewing Bee tea dress, shoulder button detail - Hazel Fisher Creations
With the Great British Sewing Bee having recently returned for a new series I'm feeling inspired to start my next project - I just need to decide what that will be!
Do you love sewing and knitting too?  What are you making at the moment?

Thursday 26 May 2016

Website redesign and changing web hosts

Over the last few months I have been working on rebuilding my website, from scratch, and this week I was finally ready to make it go live!  In this post I'm sharing some of the reasons behind rebuilding my website and my experience of changing web hosts, which I hope might be interesting if you are in a similar situation with your own website.

My old website was hosted on Moonfruit and had served me well for several years.  I used their free package, but had found this no longer suited me for a couple of reasons.  Being free, it had always had advertising for Moonfruit on.  This had been more discreet in the past, but had changed to a big green banner at the top which I do not like.  I also found the number of pages and storage space allowed was too restrictive for my needs - so it was time I made a change! (You can see a screenshot of the old website below).

My website, old version May 2016 - Hazel Fisher Creations
I looked at Moonfruit's paid plans and did some research into other web hosting options.  I decided that it would be best for me to move my website to another host. I was nervous of moving though, because my technical knowledge of hosting is quite limited - all the options and jargon is quite daunting!  In the end I chose TSOHost because they had the best price for the storage space and bandwidth I need and found they had very good reviews for their customer service.  So far my experience of using TSOHost has been good.  It was quick and straightforward to buy and set up the hosting (I went for their Lite Cloud Hosting plan).  I was able to redirect my domain (which is registered with another provider) easily too.  I did have some problems getting my website to go live, but found TSOHost's help articles and videos very useful and managed to work out what I was doing wrong. (It was quite a simple solution - I just needed to move my website's files to the correct folder!)

My website hosted on Moonfruit was built using their website builder, so leaving them meant that I had to build my website from scratch (again).  I have done this before using Serif's WebPlus program, but not for several years so it meant that I had to refresh my memory in using WebPlus!  I find it's a fairly easy program to use to build websites - you don't need to know code and there are plenty of tutorials to guide you through the various stages of website building.

Since I was rebuilding my website I decided it was a good time to give my logo a bit of an update too.  I've also created a new banner to use on my website, blog, shops etc and used the colours from this (teal, blue, green, pink and yellow) throughout my website.  I really like these new colours - they brighten up the pages and hopefully add a little fun to them too!  You may have noticed that I have also used these to update the design of this blog.
Here is a screenshot of my new website's home page...

My website, new updated version May 2016 - Hazel Fisher Creations
I have a few things I plan to tweak on the site still, but I'm pretty happy with how it looks now.  I'm glad that I no longer have the Moonfruit advertising banner on it, so hopefully it now looks more professional.  I also have more space for putting images of my designs on, and will be regularly adding new pictures to the various galleries of my portfolio.

I've tested the website myself and think everything is working properly, but if you have a few minutes and would like to check it out yourself I would really appreciate it!  If you notice anything wrong (broken links etc) please do let me know.  You can visit my website here.

Monday 23 May 2016

Stop Worrying About What Could Go Wrong...

Positive Thinking: Stop worrying about what could go wrong and focus on what could go right, hand lettering by Hazel Fisher Creations
I thought it was time I did another 'Positive Thinking' post (the last was back in February - how time flies!).
If you're like me you'll easily come up with a million things that could go wrong; "but what if....".  It might happen, or it might not.  Worrying doesn't really help but it can sometimes be hard to stop.  I try to remind myself of these words, and focus on something more positive.
Stop worrying about what could go wrong and focus on what could go right.

Saturday 14 May 2016

Colour Palette Inspiration #27 - Apple Blossom

Colour Palette Inspiration - apple blossom by hazel fisher creations
I love spring flowers!  While seeking out some pink blossom to photograph I spotted this pretty apple blossom growing over the fence from my neighbours garden.
If you enjoy seeing my photos of flowers you might like to check out my Instagram page - I share more photos over there :)

Thursday 12 May 2016

Learn how to make your own sketchbooks

Learn how to make your own sketchbooks in the DIY tutorial by Hazel Fisher Creations
How to Make You Own Sketchbook - learn this bookbinding technique to make sketchbooks, journals and notebooks! hazel fisher creations
I have been making my own little books and sketchbooks for years and there are so many different techniques to try.  Once you learn the basics you will find that you can use your creativity to make each book totally unique!  Back in January I shared a tutorial on how to make really simple matchbook notebooks and today I will show you how to make something a little more complicated, using a stitched technique - but once you get the hang of it you can use it to make your own sketchbooks, notebooks, journals and more!

You will need:
paper for the pages (I used 140gsm cartridge paper)
strong thread (I used Gutermann's extra strong polyester thread)
pencil
ruler
pin
needle
craft knife and cutting mat
greyboard
linen / cotton fabric (for the spine)
decorative paper (for the cover - I used wallpaper)
PVA glue

1. Start by cutting your paper for the pages.  Cut all pages to the same size.  My paper was approximately A3 in size - so the finished sketchbook will be A4.  But you can make books any size you like!

2. Split your paper into sections - I used 4 sheets per section, with 5 sections in total.  Fold each section in half.

How to Make You Own Sketchbook - learn this bookbinding technique to make sketchbooks, journals and notebooks! hazel fisher creations
3. Take 1 section, open it out and mark holes, for sewing along the centre fold using a pencil. Repeat this for all sections.  You need an even number of holes, spaced the same for each section - so measure carefully!  These are the measurements I used for my pencil marks: measure from one end and mark at 1 inch, 2 inches, 3.1 inches, 4.1 inches and 5.2 inches. Repeat, measuring from the other side - so there are 10 dots.

4. Use a sharp pin (or an awl if you have one) to make holes through all sheets in each section, through your pencil dots.

How to Make You Own Sketchbook - learn this bookbinding technique to make sketchbooks, journals and notebooks! hazel fisher creations
5. Tie a knot in your thread and start sewing from the outside of the section to the inside, through your first hole.

6. See image 6 for my numbered diagram of the holes - sew in this pattern: up hole 2, down hole 3, up hole 4, down hole 5, up hole 6, down hole 7, up hole 8, down hole 9 and up hole 10.
Tip! Remember to keep pulling your thread tight as you go along, for a neat finish.

7. Now start to join the second section to the first.  Go down hole 10 in the second section, up hole 9, down hole 9 of the first section, up hole 10, down hole 10 of the second section, up hole 9 then down hole 8 of the second section.

8. Continue up hole 7 in the second section, down hole 7 in the first section, up hole 8, down hole 8 in the second section, up hole 7 and down hole 6 in the second section. Continue in this pattern until the first two sections are joined together.

9. It should now look like picture 9.  It might sound complicated, but it's easier once you try it for yourself and see the pattern working.

How to Make You Own Sketchbook - learn this bookbinding technique to make sketchbooks, journals and notebooks! hazel fisher creations
10. Repeat the same stitching pattern to join section 3 to section 2 and so on, until all sections are joined together. Tie a knot in the thread to finish off.

11. The spine of your book should look like image no.11.  Make sure that any time you need to start or finish the thread, the knot is on the outside.

12. Now you're ready to make the cover.  Start by trimming the edge of your book so the pages are even.

13. Cut 2 pieces of greyboard, slightly larger than the size of your book.

How to Make You Own Sketchbook - learn this bookbinding technique to make sketchbooks, journals and notebooks! hazel fisher creations
14. Cover the greyboard in your decorative paper (I used some bargain wallpaper I bought for £1 ages ago).  Also trim a piece of fabric for the spine, slightly longer than the book and wider than the spine.  I used a scrap of cream fabric which I think is linen and works well for this.

15. Fold over the ends of the fabric, so it is now the same length as your book and the raw edges will be hidden inside.  Glue the fabric along one side at a time.  I don't glue the actual spine, but along the  edge of the page close to the spine.  Leave to dry.

16. Glue the covers to the front and back pages.  Tip! - Leave to dry under a heavy book or board.

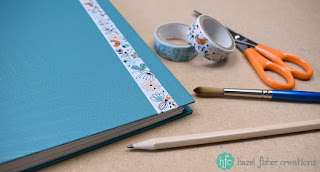
Finally I decorated the front cover of my book with some pretty tape...

How to Make You Own Sketchbook - learn this bookbinding technique to make sketchbooks, journals and notebooks! hazel fisher creations
I hope that you enjoyed this tutorial and feel inspired to try making some books yourself.  If you share your makes on social media, use the hashtag #myhfcmakes - I would love to see them! (You can find me on Instagram and Facebook)

How to Make You Own Sketchbook - learn this bookbinding technique to make sketchbooks, journals and notebooks! hazel fisher creations

Wednesday 4 May 2016

Introducing my Newsletter and A Free Printable Card!

Free Printable Colour in Thank You Card by hazelfishercreations
One of the goals I set myself for my business this year was to start a newsletter, so after some research I have been learning to use Mailchimp.  I am excited to announce that I am now ready to start signing people up to subscribe and the first newsletter should be going out later this month!

I plan to share things like my latest designs, blog posts, exclusive offers and other exciting news.  I'll send a newsletter out once or twice a month - so don't worry, I won't be filling your inbox with too many emails!  I hope that it will be something people will enjoy receiving.
As a special thank you, if you sign up to my newsletter, you will also be able to download a free printable colour in thank you card which I have designed (which you can see in the photo above).

As well as working on a newsletter, I have been redesigning my business logo and website, which I hope to launch very soon! You will get to see a sneak peek at my new logo / banner design if you sign up to my newsletter as it appears in the "welcome" email.
You can sign up to my newsletter here (you can unsubscribe anytime you like).  I hope you like using the free printable card!