Wednesday 27 May 2015

Spoonflower Contest – Mermaids & learning Illustrator

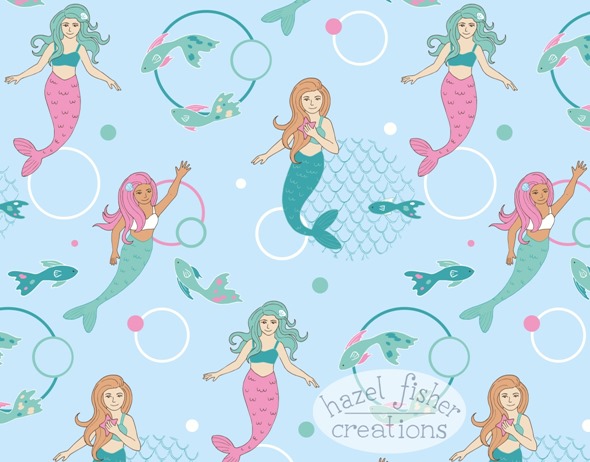
2015 May 26 Spoonflower mermaids contest illustration hazelfishercreationsThis week’s Spoonflower contest has the added excitement that the winner will have the chance of their design being made into pajamas by CWDkids!  The challenge has a Mermaids theme and one of the requirements was that the design should contain a maximum of 8 colours.  At first I found it quite difficult restricting myself to just 8 colours, but it was a good challenge and made me think carefully about how I used the same colours across different elements of the design.

You can see my Mermaids design on Spoonflower here.  As usual you can see all the other entries and vote for your favourites on Spoonflower:  http://www.spoonflower.com/contest_voters_temp/new?contest_id=304

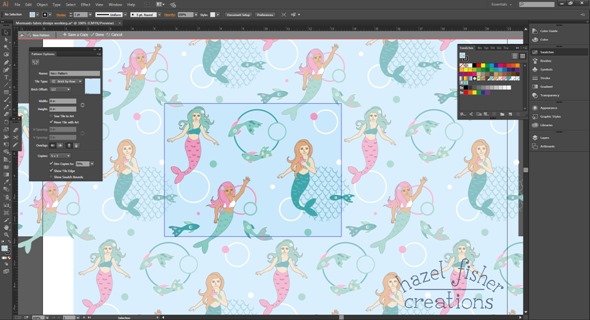
Another aspect of this challenge was that the winning design would need to be sent as a vector file, so it was suggested the original file should be prepared for this.  I have vary rarely worked with vectors so this design was a good opportunity for me to try something new and learn more about vectors!  I found that you can get a free 30 day trial of Abobe’s Illustrator and I love that I have been able to try out the full program (unlike some trials for other programs which limit the tools you can use).

2015 May 26 Spoonflower mermaids contest illustration hazelfishercreations 3
I have only learnt a little so far – enough to allow me to create my Mermaid design.  I like the Image Trace tool, which I used to convert my scanned pen drawing to vector line art, as it allows me to change the scale of my drawing and to easily change the colour of the lines.  I don’t usually use flat colour to fill in my designs, but for this challenge it worked well.  I also like Illustrator’s tool for creating patterns as I could instantly see how the repeat worked.

I’m still part way through the free trial so have time to play around a bit more.  I’m undecided yet as to whether I would take up the monthly paid subscription.  I had never really used Illustrator before; partly because the high price has put me off using it in the past.  Although it is still quite an expensive program, now Adobe have all their programs in the Creative Cloud if a project comes along that I really need it for it’s good to know I could just subscribe for the month I need it.

I would also like to test out Serif’s Drawplus X8 to see how that compares to Illustrator (I already use Photoplus and Pageplus from Serif).  Do you use Drawplus or Illustrator?  What do you think of them?

2015 May 26 Spoonflower mermaids contest illustration hazelfishercreations 2

Friday 15 May 2015

How to Make: 'Celebrate' Citrus Cake Card using the Silhouette Cameo to cut text

Celebrate Citrus Cake Card diy tutorial hazel fisher creations 1b
I am loving bright citrus colours at the moment – like in the colour palette I made from my birthday flowers.  I used this palette as inspiration for this card which is made with a patterned scrapbooking paper and digital stamp which I designed.  This card was also a good opportunity to make my first tutorial using my Silhouette Cameo cutting machine which I introduced earlier this week – I used it to cut the text on this card.  If you don't have a cutting machine you could cut the text by hand, print the word onto paper and stick to your card or hand draw it directly onto the card.


To make this card you will need:
  • White A6 card blank
  • Printable orange chevron patterned paper (see end of post)
  • Printable cupcake with a candle digital stamp (see end of post)
  • white card and paper
  • Coloured pencils and/or pens
  • 3x gems (I used pink and yellow round 5mm gems)
  • 3mm wide satin ribbon (I used lime green)
  • glitter glue
  • glue, double sided tape and foam pads
  • scissors, craft knife and cutting machine
  • Silhouette Cameo 2 cutting machine and Silhouette Studio software
  • Computer and home printer

1.  First you will need to print the patterned scrapbooking paper onto white paper and cupcake digital stamp onto white card.

2.  Cut the word 'Celebrate' with the Silhouette Cameo, using Silhouette Studio software:

Type the word 'Celebrate' (I used the font ‘Lobster’, which is free to download if you don’t already have it installed on your computer.)   I adjusted the size of the word so that the letters were approximately 3/4 inch tall.

Celebrate Citrus Cake Card diy tutorial silhouette cameo hazel fisher creations 3

You will see that some of the letters overlap. We just want to cut the outline, not where the letters overlap, so in 'Cut Settings', select 'Cut Edge'.

Celebrate Citrus Cake Card diy tutorial silhouette cameo hazel fisher creations 4

I cut the word from white card, with the ratchet blade set to no.2.  (I recommend doing a test cut first to check which setting you need).  After cutting the word I coloured it with pink felt tip pen – you could just cut it from pink card!

3. Glue the word ‘Celebrate’ onto the card blank.  Then stick the orange patterned background paper onto the card blank – lining it up with the word ‘Celebrate’, leaving a small gap between the word and background paper.  Trim the background paper to the size of the card.

4. Colour the cupcake (I used coloured pencils) then cut out leaving a small border around the edge.

5. Glue the ribbon along the edge of the orange patterned paper.  Glue 3 gems below the word ‘Celebrate’.  Then attach the cupcake to the card using foam pads.

6. Finally add some sparkle with glitter glue on the cupcake!

Happy crafting!

Celebrate Citrus Cake Card diy tutorial hazel fisher creations 4
About the papers used in this project: The printable scrapbooking paper and digital stamp I used in this card are both my own designs and are available to buy from my Etsy shop – the orange chevron paper is from the Citrus set of scrapbooking papers and the cupcake is from my Cupcakes and Roses set of digital stamps.

Celebrate Citrus Cake Card diy tutorial hazel fisher creations 2

Tuesday 12 May 2015

Introducing my Silhouette Cameo 2 Electronic Cutting Machine

I have an exciting new machine to show you today – my Silhouette Cameo 2 Electronic Cutting Machine!
It’s still quite new to me, so I decided that a good way to learn all the features and ways of using the machine would be to set myself some projects to blog about.  I’ll be sharing some of those soon, but I thought that I would start off with just introducing the machine for anyone who has never seen one before.

2015 April 29 Silhouette Cameo cutting machine introduction hazelfishercreations 1
What’s a cutting machine? Why choose the Silhouette Cameo?
I do cut things by hand with a knife or scissors, but was considering buying a cutting machine which would be able to cut detailed designs, more quickly (and with less pain - not more hand cramp!).  There are various cutting machines on the market, from manual die cutting machines (eg: the Sissix Big Shot) which use metal dies, to electronic cutting machines which look like home printers but use a blade to cut rather than print designs.  I wanted an electronic cutting machine so that I could cut my own designs and not be limited by using dies.  Also, although the initial price of an electronic machine is more expensive they actually work out cheaper than a die cutter in the long run because you don’t have to buy a metal die for every design you want to cut.

I had looked at the Brother ScanNCut and the Cricut Explore before choosing the Silhouette Cameo 2.
There are pros and cons for each machine, but for me the Silhouette came out on top when balancing the features I was looking for with the cost (it’s about half the price of the Brother machine!).
Some of the features I like about the Silhouette Cameo…
  • Cuts a variety of materials including card up to 350gsm, fabric, magnet, vinyl – either using the 12x12 inch mat or on a roll feed.
  • Cuts your own designs using the Silhouette Studio Software, which is easy to use.  It also has an optical scanner to read registration marks printed on the design to cut precisely around the image.
  • Cuts fonts installed on your computer.
2015 April 29 Silhouette Cameo cutting machine introduction hazelfishercreations 2What comes in the box?
There are different packages available, with extra tools and pens, but I chose to buy the basic package from Amazon.
This included the machine, with power adapter and USB cable, Silhouette Studio software, blade, 12x12 inch cutting mat, crosscut blade and instruction booklet.  It also came with 100 free designs and a free 1 month's subscription to their design store.

How does it work?
I found it was easy to set up – it connects to your computer by USB and within a short time I was able to start cutting.  The only problem I had initially was that the cutting mat is very sticky when you first use it.  I tried a sheet of scrapbooking paper for my first cut – this became firmly stuck to the mat and was not easy to remove without tearing the paper, very frustrating!  I read that you can try pressing a smooth fabric (jeans!) over the mat to reduce some of the initial stickiness, also use a thicker card for your first cuts.  Now I’ve used the mat a few times it is much better.

There are extra tools you can buy, but I have been using things I already have.  For example, a scalpel has been helpful in picking up small pieces from the mat.  You can get a scraper tool to help ease paper from the mat after cutting, instead I have been using an old credit card.

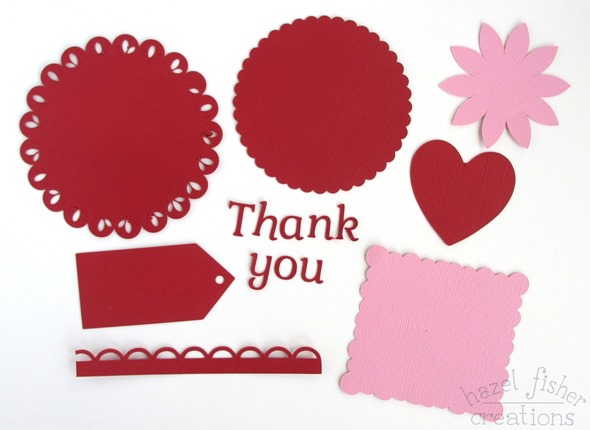
These are a few of the shapes I have tried cutting so far.  I have been impressed with how accurately it cuts very small items – the letters are less than 2cm tall…

2015 April 29 Silhouette Cameo cutting machine introduction hazelfishercreations 3
I will be posting some projects I have used the Cameo with soon - the first one will involve cutting text to use on a card.

Do you have a Cameo or another cutting machine?  What have you made with yours?

Friday 8 May 2015

How to Make: Dragon Cut & Sew Plushie

2015 April Dragon cut and sew plushie fabric Spoonflower diy tutorial hazelfishercreations 1A few weeks ago I posted a picture of the dragon I had made up from the Cut & Sew pattern I designed for Spoonflower.  I finally got around to taking some more photos, so I can now share this tutorial on how to make him!
You will need the Cut & Sew Dragon pattern from my Spoonflower shop.   The design fits onto a fat quarter of any fabric which is 54 inches wide (or wider).   I made mine from Silky Faille, but you could also use Linen-Cotton canvas or another fabric which is at least 54 inches wide.  The finished dragon will be about 15 inches tall.

2015 April Dragon cut and sew plushie fabric Spoonflower diy tutorial hazelfishercreations 6
You will also need:
  • Scissors
  • Needle and thread (or a sewing machine)
  • Stuffing
  • Fusible interfacing (optional)
  • Knitting needle or similar object to help with turning out.
There are instructions printed onto the fabric, but I will include a few more tips to help you here...

1. Cut out the front and back body pieces and 2 wing pieces along the dashed lines.

2. This is an optional step – Iron fusible interfacing onto the reverse of one of the wing pieces.  I did this because I made the dragon from silky faille, which is a lighter fabric than the linen-cotton canvas, to give the wings a stiffer structure.

3. With right sides together, sew with backstitch (or machine stitch) around the edge of the wings, close to the outline.  Leave an opening between A and B.

4. Trim and clip seams (around the curves and points of the wings).  Turn the wings out – a knitting needle or similar object will help you to gently turn out the points of the wings.  Lightly stuff, then sew the gap closed with ladder stitch.
 2015 April Dragon cut and sew plushie fabric Spoonflower diy tutorial hazelfishercreations 4
5. Sew the wings to the back body piece along the centre line (marked on the wings and the back piece.

6. Pin the dragon front and back with right sides together and the wings folded in half through the gap between C and D (see below)  Sew the dragon front and back together, leaving an opening between C and D.

2015 April Dragon cut and sew plushie fabric Spoonflower diy tutorial hazelfishercreations 37. Trim seams and clip around the ears.  Turn the right way out.

8. Stuff and sew closed the opening between C and D using ladder stitch.

2015 April Dragon cut and sew plushie fabric Spoonflower diy tutorial hazelfishercreations 2
If you make up one of my dragons I would love to see how it turns out!  You can leave a link to your photos below, or email me at hazel.illustrator@live.co.uk

Friday 1 May 2015

Spoonflower Contest – Flowers for Mom Border Print

2015 May 01 Flowers for Mom border print Spoonflower fabric design contest hazelfishercreations1I was excited to see the results from last week’s Bees themed Spoonflower contest – my design came 27th out of 502 entries (with 263 votes)!  Thank you to anyone who voted for it!  You can see the winning design, and the rest of the top ten, on Spoonflower’s blog.  I’m getting a collection of new designs together so hopefully it won’t be long before I have enough to be able to order another swatch sampler and then make the new designs available to buy.

This week’s contest theme is ‘Flowers for Mom Border Print’, which involved creating a floral design to run along the selvage edge of the fabric.  The designs will be previewed at one yard size (42 x 36 inches), so I created a design much larger than I usually work on.  I drew the flowers in pen across 2 sheets of A4 paper and coloured them digitally.  The tallest flowers in the final design are about 22 inches tall.  Below is how my entry looks, showing the full width of 42 inch wide fabric…

2015 May 01 Flowers for Mom border print Spoonflower fabric design contest hazelfishercreations2You can see all of the entries to the Flowers for Mom Border Print contest, and vote for your favourites, here:  http://www.spoonflower.com/contest_voters_temp/new?contest_id=301