Monday 25 July 2011

Cute animal art

I had to share these Etsy treasuries that I've recently had work included in...
'For The Love of Another' - the polar bears in this are amazing!  See the treasury in full here.
In Loving Memory of Hammy - see the cute hamsters in this collection here.

Thursday 21 July 2011

Paper Rose Card and Tag Kit ~ Tutorial

Here's the tutorial for Kit #002 - to make an Anniversary or Wedding card and matching gift tag. (Craft kits are available to buy in my Etsy supplies shop.)

The kit contains... a card blank, envelope, paper, card, 2 paper roses, ribbon, beads and thread. (The handmade paper included is made by my own hands!)  You will need basic materials to complete the kit - scissors, glue, a needle and thread.  I like to also use a craft knife, ruler and different glues; glue stick, pva craft glue and double sided tape.
To make the card...
1. The first step is to bend the wire stem of the rose into a heart shape.  You can use either your hands or pliers - whichever you find easiest.
Use the handmade paper backing as a guide as to where the top of the heart should be, bend the wire here.  Then bend the remaining length in half.
Shape each half into a heart shape.  Then thread on the beads - you may need to open the heart out a bit again but it's easier to bend closed again than to thread the beads on first.
2. To attach the flower to the backing paper...
Lay the flower where you want it to be on the paper and with a needle or pin make 4 small holes (as shown by the blue dots on the photo).
Using a thread that blends in with the colour of the stem, sew up through each hole, over the stem and back down through the same hole again.  Secure the thread on the back.  This will hold the flower in place and stop the beads from falling off.
3. Mount the handmade paper and flower.  You could cut the red paper, but I have chosen to tear it against a ruler for a softer, torn edge.
4. Next glue the larger backing paper to the card.  Chose whichever layout you like - here are a few ideas...
I've chosen to glue it horizontally along the top.  Trim the edge then attach the mounted flower.
5. Glue along the edge of the paper and stick the ribbon to the card.  (Tip... to get the ribbon nice and straight hold it taut across the card as you lay it down, then smooth along the ribbon to ensure it is firmly stuck down.)
Trim the ends of the ribbon, I also like to add a little dot of glue to keep the ends tidy.
6. Finally add the message.  Included in the kit are 3 messages - 'On Your Anniversary', 'Congratulations' and 'On Your Wedding' so you can adapt the card for different occasions.
I chose 'On Your Anniversary' for this one.  I cut out the message and added a simple pen border before glueing to the card.
To make the tag...
1. Make another rose attached to a handmade paper backing in the same way as for the card.  Then glue to the gift tag.
2. To finish, tie the thread through the hole in the card.  I plaited the thread here as an extra touch.
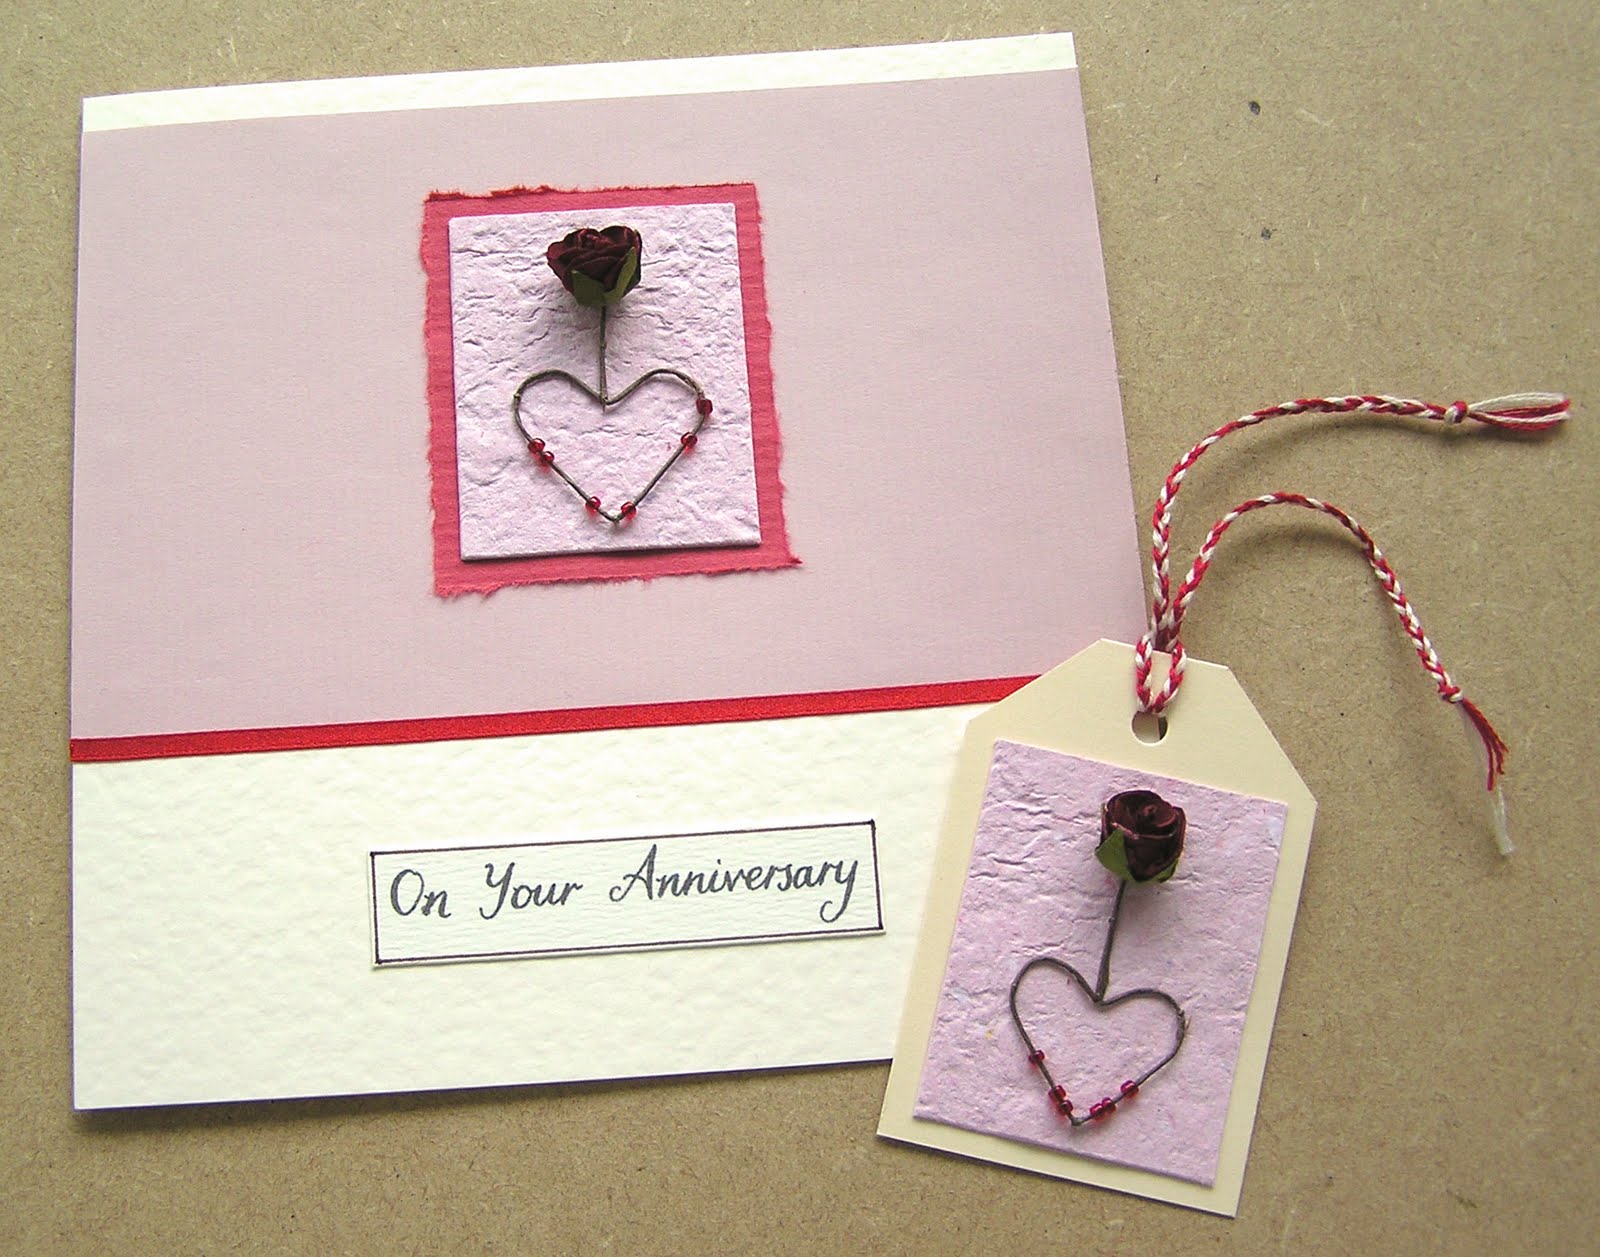
The finished card and gift tag!...

Wednesday 20 July 2011

Magazine article - Art Business Today

I was recently interviewed for an article about selling art online. Although I haven't been able to see a print copy of the article, I was very excited to see my little contribution (and Mechanical Butterfly illustration) included in the latest edition of 'Art Business Today'! :D (You can see the magazine online here, the article 'Embracing the new' starts on page 46).
The article is a really interesting read - comparing different online markets and the experiences artists have with selling through them.

Friday 15 July 2011

Rabbits, Goats and more!

Last Saturday I went to the Tendring Hundred Show with my sister.  It's the second time we've visited the show and it was another great day out!  Last year I think the show was on one of the hottest days of the year, this time wasn't so hot - much better for the animals (and me too!).
We enjoyed looking round all the stands (food, craft, shopping etc) and especially loved seeing all the animals - goats, rabbits, guinea pigs, pidgeons, sheep, chickens and more in all shapes and sizes.  I wish the baby rabbits had found their way into my pocket to come home!! :)

Monday 4 July 2011

Fabric Bird Card Kit ~ Tutorial

I have recently been planning some new craft kits for my Etsy supplies shop, this tutorial is for my first new kit to make a cute fabric bird notecard.

The kit contains... a card blank, envelope, paper, fabric, ribbon, button, gem, sequin, bead and template.  Although only basic supplies are needed to complete the project - (scissors, glue, pencil, a needle and thread) - I will also be using a sewing machine, craft knife, ruler and 3 different types of glue - glue stick, pva craft glue and double sided tape.
To make the card...
1. Cut out the bird body and wing template.
With the back of the fabric face-up draw around the template and cut it out. (tip: use a soft pencil)  The fabric comes with fusible interfacing already attached to make cutting and sewing easier. 
 
 2. The patterned backing paper can be arranged however you like it - covering the whole card, or with some of the card showing...
  I like to have a border around the edge, so cut the first piece to measure 7x 9cm.

 3.  Next sew the bird body onto the paper you have just cut.  Whether you choose to hand or machine stitch, use a little glue to hold the bird in place.
 I have machine stitched around the edge of my bird using a contrasting colour thread...

 4. Lay the bird's wing and button where you want them and use a needle to mark the button holes.
Sew the button on...

5. Lay the sequin on where you want the bird's eye to be and mark with the needle again.  Pass the needle up from the back, thread on the sequin then bead and pass the needle back through the sequin and same hole again.  Secure the thread on the back.

 6.  Cut the smaller piece of backing paper to size - I cut mine to 2.5x9cm. Then stick to the card (I used double sided tape and a glue stick).
 Attach the paper and bird in the same way - I have left a small border around the edge of the card.

7. Add a thin line of glue along where the backing papers join for the ribbon.
 Tip... to get the ribbon nice and straight hold it taut across the card as you lay it down, then smooth along the ribbon to ensure it is firmly stuck down.
 Trim the ends of the ribbon.  I also like to add a tiny spot of glue to keep the ends neat.

 8. Finally glue the flower gem onto the card.

 Voila! A finished fabric bird notecard...